来自陈欣涛,范偲慧的报道。小编的话:在手忙脚乱的赶图季,我们往往被一张效果图搞得焦头烂额,你是不是也和小编一样,苦于没有一套可以参考的ps图层分类标准呢?本期Alex男神帮你排忧解难~O(∩_∩)O~,手把手教你如何管理好你的psd图层。
建筑表现图因为复杂而混乱的psd文件而“臭名昭彰”。但是有些时候,在我看来,一个很小的习惯往往能发挥巨大的作用,图层管理就是这些实用但是往往被人们忽略的习惯之一。在ps中合理地管理图层能够给你带来更高的效率、一个更加方便编辑的文件,甚至在大多数情况下能够呈现更加好看的图面。在过去的几年,我逐渐探索着建立一个建筑领域的ps文件体系。这套体系未必适用于每一个人,但是它的确简化了我的工作流程,并且使我获得了更清晰的图面。
Architecture visualization is notorious for producing complex and messy PSD files. Sometimes, it’s the little things that can make a big difference and in my opinion, layer management is one of those little things that many people don’t put enough emphasis on. Properly managing your layers in Photoshop can lead to better efficiency, a more editable file, and in many cases better looking illustrations. Over the years, I have moved toward a system of building up Photoshop files. This system may not be perfect for everyone but has streamlined my workflow and has lead to cleaner looking illustrations.
Psd文件的问题是它们非常容易失控。我的许多ps文件往往很容易就超出了几百个图层。轻视文件命名或者没有适当地将图层建立成组可能在刚开始的时候能够节约一点时间。但是一旦你在ps中工作了几个小时,那么你所花费在找到并修改正确图层上的时间会远远超过你在开始阶段所“节省”下的时间。不仅如此,图片本身也会开始变得混乱而无法继续加工,因为图层蒙版和灯光控制会变得非常困难。
The problem with PSD files is that they can quickly get out of hand. Many of my Photoshop files that I work on easily exceed several hundred layers. Being careless about naming files or not properly grouping them may save a little time in the beginning. However, once you are several hours into Photoshop, the time wasted trying to find the right layers or make changes far exceeds the time saved at the beginning. Not only that, the image itself will start to get messy and unrefined since it becomes difficult to mask layers and control lighting.
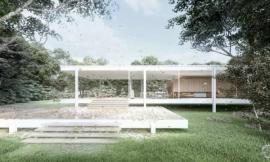
我整理了一个实例,里面包含了大量不同类型的组,并且都是我的psd文件里面经常用到的。显然,从一个图片到另一个图片,这些基于图片类型不同而创建的组会发生改变,但是在大多数情况下,总体的结构还是保持一致的。另一个值得注意的是,我所讲的组织psd文件的方法并不是“唯一正确”的方法。我相信一定有其他甚至更好的方法来做到这一点。但是这套系统对我来说很有用,并且根据图片的类型提供了大量的弹性空间。
I put together an illustration that takes into account a lot of the different types of groups that I typically use in my PSD files. Obviously, the specific groups change from illustration to illustration depending on the type of image, but for the most part, the overall structure remains consistent.
One other note, I am in no way saying this is the “right” way to organize PSD files. I am sure there are other ways and even better ways to do this. However, this system works well for me and provides a good amount of flexibility depending on the type of illustration I am working on.
Groups, Masks, and Adjustment Layers分组、蒙版、调整图层
创建组
整理ps文件的一个利器就是(groups)创建组。Groups是图层管理器下的一个文件夹,它可以包含一个和多个图层。组能够让你将众多令人崩溃的图层整理成简单的一行,使你能在几百个图层中快速找到需要的图层。另一个巨大的好处就是你可以为你的组做蒙版(masks),这在编辑的时候非常有效。你只要单击图层管理器底部的文件夹图标,一个组就这样创建了。图层可以单独或多个一起被拖进文件夹里面。
Groups
One of the keys to a clean Photoshop file are groups. Groups are folders in the layers palette that contain one or more layers. Groups allow you to collapse many layers down to a single line allowing you to navigate between several hundred layers quickly. One more big advantage is that you can apply masks to groups which is useful for editing. A group can be created by clicking the folder icon at the bottom of the layers palette. Layers can then be dragged into the folder one at a time or several at a time.
蒙版
运用“无损”的方式来编辑你的图层,会使得你的工作效率大幅提高,并且最大程度地保证文件可编辑性。你可以通过某种方法编辑你的图片,但是之后出于某种需要,你的这些修改还可以被撤销。
蒙版对于无损编辑是必不可少的,或许你之前没有使用过这个工具。在这里,我很少提到蒙版,因为对于刚刚接触它的人来说会觉得它非常难掌握。然而,它对于裁剪背景层或者删除图层的一部分非常有效。蒙版正如它听起来那样,可以允许你遮盖或者隐藏图层中的一部分,类似擦除。两者的区别在于,蒙版是可以恢复的。
Masks
A big part of working efficiently and keeping your files extremely editable is by using “nondestructive” methods to edit your layers. The idea is to edit the illustration in a way where changes can be reversed later on down the road.
If you’re not using them already, masks are essential for nondestructive editing. I have talked about masks on this site only a few times because they can be difficult to understand at first. However, they are a life saver when it comes to cutting out backgrounds or removing parts of layers. Masks are exactly as they sound allowing you to mask or hide parts of the layer similar to erasing. The difference being the mask can be removed later to bring back the area of the layer that was erased.
调整图层
就像蒙版一样,调整图层也是无损的操作,可以同时调整多个图层的色阶、对比度、色相等属性,并且可以随时撤销操作。调整图层如同一个真实的图层一样允许你调整它的透明度,甚至你还可以为它做一个蒙版。我使用它们的次数并不多,但是它确实非常好用。
Adjustment Layers
Just like masks, adjustment layers are nondestructive and allow you to adjust things like levels, contrast, hue, etc. to several layers at once and also reverse the adjustment at any time later on down the road. Adjustment layers act like real layers allowing one to adjust the strength through opacity or even apply a mask to the adjustment. I don’t use these too much but have found them really useful from time to time.
Organizing the Layers图层的组织
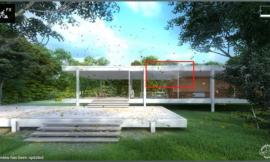
以上这个是一张效果图图层管理的截屏。你很快会发现每一个图层都是成组的。将所有图层都分组管理能够使我移动和调整图层变得更加容易。它还强迫我用心去思考放置这些图层的最佳的位置,以便在后期操作中能快速找到。
Above is a screenshot of the layers palette for this illustration. You will quickly notice that everything is grouped. Having everything grouped allows me to collapse all layers and move around the palette more easily. It also forces me to really think about the best place to locate layers so that finding them later won’t be so time consuming.
1. Base Files Group/基础文件组
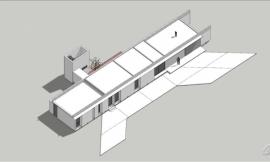
整个ps工作流程的开始是几张从Sketchup和例如V-Ray等渲染引擎里面导出的图片。这些图片往往包含了渲染底图(base rendering)、反射通道(a reflections export)、折射通道(refraction export)、线图(line work)、环境阻光(AO)、景深通道(z-depth)、alpha通道等等。所有的这些图层都被放入“基础文件”组里面。这些图层是核心图层,我们今后所有的ps操作都是建立在这些核心图层的基础上的。一旦这些图层整理完毕,我们就需要为这个组建立一个蒙版,利用alpha通道移除天空和背景元素。
The Photoshop process begins with several images exported from both Sketchup and a render engine such as V-Ray. These images often include the base rendering, a reflections export, refraction export, line work, ambient occlusion pass, z-depth, Alpha, among others. All of these layers are placed in the “BASE FILE” group. These layers represent the core layers from which everything else in the Photoshop file builds off of. Once these layers are compiled, a mask is applied to the group to remove the sky and background elements using the Alpha layer.
2. Sky Group (Below the Base Files Group)/天空组(置于基础文件组下方)
整理好基础文件之后, 我开始处理天空。我之所以这么早地去处理天空,是因为天空在我们整个图面的基调上扮演非常重要的角色。它会影响整体的颜色和氛围,因此提前解决天空是一个良好的开始。我会经常合并不同的天空图片来获得我所期待的效果。因为我已经用蒙版隔离了基础文件组,只需要将天空组拖到基础文件组下方,之后进行适当的移动和缩放,直到得到不错的图面效果。
After compiling the base files, I bring in the sky. I like to do this early on because the sky plays a big role in setting the tone of the image. It can impact the coloring and mood so figuring this out first gives the image good momentum. I will often combine several sky images to get the exact look I am going for. Because I masked out the BASE FILES group, I can simply drag the SKY group below the BASE FILES group and shift and scale the location until I get something that looks good.
3. Background Group (Below the Base Files Group and above the Sky Group)/背景组(放在基础文件组和天空组下)
紧接着天空之后,我开始导入背景元素,其中包含了周边的建筑环境和那些没有被建模或者渲染的景观。背景组成来自许多方面,例如甲方提供、谷歌图片搜索、或者谷歌街景等。
Along with the sky, I bring in the background elements which includes the surrounding site buildings and landscape not modeled or rendered. The background information comes from many places such as the client, Google image search, or Google street view.
4. Ground Plane Group/地面组
地面组包含了道路的材质、人行道的材质和绿化部分例如草地。这时,整张图已经打下了一个好的基础,只要锦上添花即可。接下去就是大量的细节,比如灯、汽车、人和树木。
The ground plane consists of road textures, sidewalk textures, and green areas such as grass. At this point, the entire image has been tweaked and a good base is in place. From here, there will be a lot of detailing with light, cars, people, and trees.
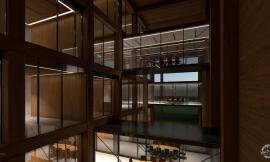
5. Interior Group/室内组
在这一张效果图里面,有大量的玻璃和室内场景。我希望将这些单独创建一个组而不是在基础文件组进行调整。理由是这个图层将包含所有的室内场景,包括人物、家具、灯具等,而这些内容可能在后期会添加大量的图层。这样单独成组的优势就是我可以用一个主要蒙版来划分竖档和定义窗口。
In the case of this illustration, there is a lot of glass and interior information. I like to keep this a separate group instead of making these adjustments with the BASE FILES group. The reason being that this group houses all things interior including people, furniture, and lights which can sometimes add up to a ton of layers. The advantage of keeping all of these layers in one group is that I can use one master mask to cut out mullions and define the windows.
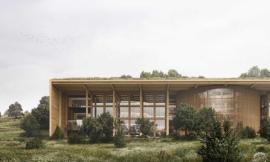
6. Tree, People, and Car Groups/树、人、车组
现在已经有了一个非常好的底图、天空和地面。我开始向里面添加树木、车和人,并分别创建了三个组,并在每个组内都创建了一个阴影副组。我把所有的阴影都放置在副组中,这样方便我一次性控制所有的阴影透明度,而不需要一个个地调整。如何处理两个重叠的阴影相当重要。由于我是通过组来控制阴影透明度的,那么一个组内互相重叠的阴影会产生混合而不是覆盖效果。
Now that there is a good base, sky, and ground plane, I begin inserting, trees, cars and people. Each category gets its own group folder. Within each one of these groups, there is a subgroup for shadows. I place all of the shadows in a subgroup so that I can control the opacity of all of the shadows at once instead of dealing with opacity individually. This is also important when two shadows overlap. Since it is the group controlling the opacity, shadows overlapping inside the group will blend together instead of overlaying on top of one another.
在许多的情况下,我会将人和树分成多组。有时候,树在前景位置会遮住所有的东西,而有时候树充当背景会藏在建筑之后。这就需要分组来避免因为图层位置不同而制作非常复杂的蒙版。
In many situations, I will have multiple groups of trees and people. Sometimes there are trees in the foreground covering everything and sometimes there are trees in the background behind buildings. This requires separate groups to avoid complicated masking placed in different areas of the layers palette.
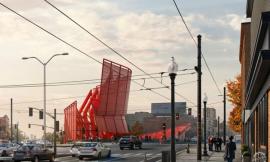
7. Effects Group/效果组
这个组往往会放在图层面板的最上端,包含例如色彩叠加、阳光、雾气和整体调整图层。什么时候将图层添加进这个组往往是不定的,有时候在流程早期,有时候则会在最后一步。无论如何,这个组往往是打造整体特征和氛围最重要的部分。
This group is always at the top of the layers palette and contains layers such as color overlays, sun glare, fog, and overall adjustments. Introduction of this group varies, it sometimes happens early on in the process or not until the very end. However, this group is one of the most important in giving the illustration character and atmosphere.
8. HDR/Plugins Group HDR/插件组
偶尔,我会在最后的效果图上再使用一些插件,例如 Topaz Labs Adjust来添加更多的细节并调整一下整体的颜色。这里面就涉及到复制并合并所有的图层(ctrl+alt+shift+e)来获得一个可以被插件编辑的单一的图层。我把这个组放到顶层,如果需要的话,我可以通过降低它的透明度来减弱插件的影响。
Occasionally, I will tweak the final illustration using some plugins/filters like Topaz Labs Adjust to bring out some detail and refine the coloring. This involves copying and merging all of the layers (ctrl+alt+shift+e) to get a single layer that the plugin can be applied to. I keep this group at the top so that I can lower the opacity and lessen the effects of the plugin if needed.
总结一下,我的效果图图层管理,虽然因图片类型不同而具有一些细微的变化,但大多都遵循着这样的图层结构。出于制作这个教程的目的,我细心地命名了每一个图层,但是在实际操作的时候,不大可能总是完美地命名每一个图层。但无论时间如何地紧张,我都会坚持在每一个项目中自始至终地命名每一个组。问题的关键在于拥有一个坚实的体系,在根本上形成一套极具效率的工作流程并创造出一份”清爽”的作品.
To clarify, most of my illustrations follow this structure with some minor deviation depending on the illustration type. For the purpose of this tutorial, I carefully named every layer but in the heat of the moment it is not always possible to take the time to perfectly name everything. I do however make a point to thoroughly name groups in all caps no matter how bad the time crunch. The point is to have a solid system in place that ultimately leads to a more efficient workflow and that produces cleaner work.
出处:本文译自visualizingarchitecture.com/,转载请注明出处。
|
|