来自专筑编辑刘庆新的报道。我收到许多邮件问我是否可以解释一下在以前的博文里怎样创建人流分析图。有许多种方法可以产生这种线条。过去,我想在CAD软件里使用样条曲线工具。在Illustrator软件里,线条也很容易被创建。但是,并不是很多人知道或使用Photoshop里的钢笔工具。在这种情况下,我将使用钢笔工具来创建一个路径,我然后让笔刷工具路径跟随它。
I received a lot of emails asking if I could explain how I created the pedestrian paths diagram in the previous post. To generate the line work, there are many ways this could be done. In the past, I probably would have used the spline tool in CAD. The line work could also easily be created in Illustrator. However, not many people know about or use the pen tool in Photoshop. It’s similar to the pen tool in Illustrator but with some minor differences. In this case, I will be using the pen tool to create a path that I can tell the brush tool to follow.
1. Setup the Brush settings/设置笔刷
首先我需要设置笔刷工具,因为我要用它给下一步的路径增加线条。这一步的设置由线的粗细、颜色、软硬和透明度来决定的。我选择硬笔刷,大小是6像素,100%透明度,颜色选黑色。你需要画一些线条来决定用的尺寸是否正确。
I need to first set the brush settings because this is what I am going to use to add a stroke to the path created in the next step. The settings in this step will determine the thickness of the line as well as the color, hardness, and opacity. I chose a hard brush, 6 pixels big, at 100% opacity, and with black paint. You may need to draw a few lines to determine if you have the correct size.
2. Setup the pen tool and begin creating paths/设置钢笔工具,开始创建路径
在选择钢笔工具之前,先创建一个新的图层。路径不会显示在图层面板里,但是描边的笔触会出现在那个图层。现在,选择钢笔工具,并确定顶部钢笔工具设置工具条的“路径”按钮被选中。
随着钢笔工具激活,开始画路径。为了创建曲线路径,在路径中选择点的同时要有点击和拖拽操作。这将创建手柄,用来控制那个点的曲线的尺寸和形状。
Before choosing the pen tool, first create a new layer. The paths will not show up in the layers palette but the stroke that is applied to the paths will be drawn on this layer. Now, choose the pen tool and be sure the “Path” option is selected in the pen tool settings tool bar at the top.
With the pen tool activated, begin drawing the paths. To create the curved paths, click and drag when choosing the points on the path. This will create handles that can be used to control the size and shape of the curve at that point.
3. Stroke Path/路径描边
一旦你得到想要的路径,在路径旁边选右键选择“路径描边”选项。如果这个选项是灰色的,再次确认你在前面的步骤中选中了新图层。
接着会出现第二个对话框,问你描边用什么工具。我们想要刷子工具,因为这是我们在第一步设置的。然后点OK即可。
点回车键来完成路径。重复这些步骤来创建每一个路径。
Once you get the path where you want it, right click near the path and choose “Stroke Path”. If this option is grayed out, double check that you have the new layer selected that was created in the previous step.
A second dialogue box will appear asking what tool to use for the stroke. We want the “Brush” tool since this is what we set up in the first step. Then choose “OK”.
To finish the path, hit the enter. Repeat these steps to create each path.
4. Generate many paths at different levels of opacities/生成许多不同不透明度的路径
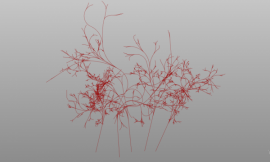
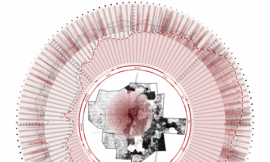
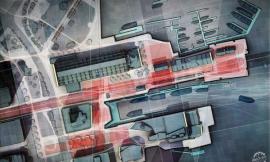
我想创建一个分层路径来体现交通的流量密度。这可以通过线条的疏密和透明度来表示。对于这个图,我创建了三种不同的路径图层。第一个图层设置透明度为100%,第二个是50%,第三个是15%。
I want to create a hierarchy of paths revealing different levels of traffic intensity. This is shown through both a density of lines and levels of opacity. For this image, I created three different path layers. The first layer was set to 100% opacity, the second to 50%, and the third to 15%.
5. Add line work glow/增加线条发光
我想要图中的线条高显,所以我给线条增加了一点发光。这用笔刷工具很容易操作。我使用一个软刷,大小是90像素,透明度设为12%。在线条密集和聚集一起的地方,我叠加了一些黑色。
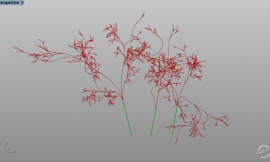
我又复制黑色路径图层并使用了一个高斯模糊。
我将背景移去,这一步就能看得更清楚。
I want the line work to have more of a presence in the illustration, so a slight glow will be added. This is done simply with the brush tool. I used a soft brush, 90 pixels big, and set the opacity to 12%. Where the lines are dense or converge together, I layered in some black paint.
I also duplicated the dark paths layer and applied a Gaussian Blur filter.
I removed the background so that this step could be seen a little more clearly.
6. Add Color/增加颜色
为了进一步凸显路径,我要增加颜色。为了更容易操作,首先,合并所有路径图层。最好是先复制这些图层并隐藏它们,这样,如果稍后需要沿着路径的话,你仍然可以编辑原始单个图层。要合并图层,选择所有路径图层,在一个图层上点击右键,选择“合并图层”。
一旦图层合并,在新的单个图层上点右键选“复制图层”。
To further punch up the paths, I’m going to add color. To make things easier, first merge all of the path layers together. It may be best to first duplicate these layers and turn off visibility so that you will still have the original individual layers available to edit if needed later on down the road. To merge, select all of the path layers, right-click on one of the layers, and choose “Merge Layers”.
Once the layers are merged, right-click on the new single layer and choose “Duplicate Layer”.
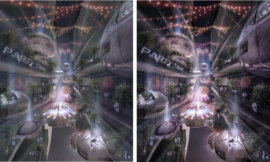
选择这个复制图层,在顶部选“图像>调整>色相/饱度”。在对话框里,首先选中“着色”框,然后移动“亮度”滑块到右侧让线条变亮。将“饱和度”滑块也移到右侧来增加颜色。最后,调整“色相”滑块得到你喜欢的色调。
With the duplicated layer selected, choose “Image>Adjustments>Hue Saturation” at the top. In the dialogue box, first check the “Colorize” box. Then move the “Lightness” slider to the right to lighten the line work. Also move the “Saturation” slider to the right to increase the color. Finally, adjust the “Hue” slider to the color tone you prefer.
7. Set Layer to Overlay/设置图层叠加
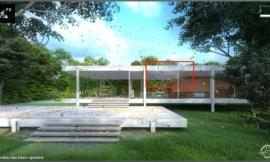
最后,将颜色图层的混合模式设置为“叠加”。这将帮助把颜色融合到图片中,并让暗色的线条在下面显现出来。
Finally, set the blend mode of the colorized layer to “Overlay”. This will help blend the color into the image and let the darker line work underneath show through.
最后,我们不用跳转到另一个软件里,如Illustrator和CAD,一系列平滑曲线就创建出来了。
The final result is a series of smooth curvy lines created without the need to jump into another program such as Illustrator or CAD.
出处:本文译自visualizingarchitecture.com/,转载请注明出处。
|
|