Making of IEEG Energy Center
由专筑网刘庆新,Vigo编译
来自EDiT的Uros和Igor在这里写下了关于“制作BOKA艺术家住宅”项目,今天他们再次展示了最近一个项目的制作过程——IEEG能源中心。这里会涉及到从一个简单的镜头开始建模,到最后的后期制作流程。
Uros and Igor, from EDiT, previously wrote here about the Making of the BOKA Artist Residence project and today they visit us again showcasing the process of making one of their most recent projects – The IEEG Energy Center. Focusing on a single shot, they will describe how they took it from model to final relying mostly on post-production workflow. Enjoy!
作者:Uros and Igor, EDiT studio
EDiT是塞尔维亚贝尔格莱德一个年青的可视化工作室,由Uros Nesic和Igor Kozic在2012年秋季创立。Uros Nesic和Igor Kozic在贝尔格莱德大学里学习建筑时,开始对建筑可视化感兴趣。使用3D制图和2D composting作为主要工具来叙述他们的项目,逐步进入ArchVIZ领域。从那时起,他们就将工作专注于“讲故事”。
Author: Uros and Igor, EDiT studio
EDiT is a young visualization studio based in Belgrade, Serbia founded by Uros Nesic and Igor Kozic in the fall of 2012. Both of them became interested in architecture visualization during their architecture studies at the University of Belgrade. Using 3D graphics and 2D composting as a main tool to narrate their projects they paved their way into the field of ArchVIZ, and since then they have focused their work mainly around storytelling.
简介
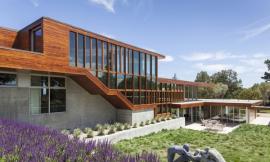
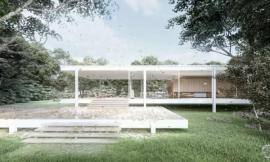
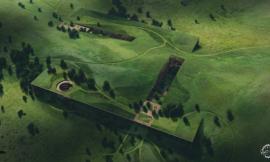
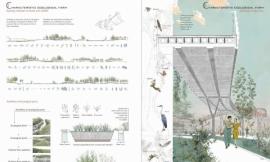
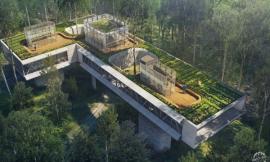
两个月之前我们为塞尔维亚的一个年轻建筑团队Monika Jovanovic,Dijana Bardzic和Jovana Kazanegra制作了一套视觉效果图。他们进行的项目IEEG能源中心是一个旧工业厂房的翻新,翻新后会被成为一个可持续能源和绿色设计的推广中心。开始听上去就很有趣,因为翻新过程会涉及到一些原始材料如水泥、金属和木材。
这篇文章我们会带你走进这个项目的背后制作过程,包括从建模到后期制作。
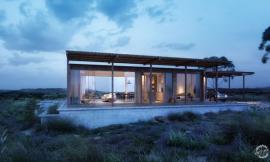
特别对于这张图,我们将重点放在墙、建筑和本身的通道之间的关系上。我们想创建一个场景,能代表建筑环境和自然元素之间的安宁和平静。解决的办法就是调低太阳光线,创建出一天的黄金时光场景。
Introduction
Couple of months ago we did a set of visuals for a young team of architects from Serbia – Monika Jovanovic, Dijana Bardzic and Jovana Kazanegra. The project they were working on, the IEEG energy center, was a reconstruction of a (not so) old industrial hall which is supposed to be made into a center for promotion of sustainable energy and green design. It sounded interesting from the beginning, as it included working with raw materials such as concrete, metal and wood.
In this article we will try to walk you through our process behind this project, from modelling to post production.
Particularly for this visual we set the emphasis on the relation between the wall, the building and the passage itself. We wanted to create a scene that represents calmness and equilibrium between the built environment and elements of nature. The idea was to emulate low sunlight, as seen in the calm golden hours of the day.
建模
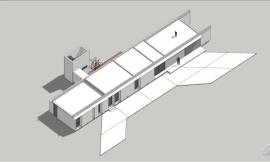
我们开始在SketchUP中开始基础建模,然后移到3ds Max中进行润色。这个阶段我们会注意保持所有图层整洁、图形清楚——大部分由分组实体组成。当把模型从SketchUP移到3ds Max时,这种方式会降低出现几何问题。我们通过材料来排列图层,这样后面的操作步骤会更简单。
The modeling
We usually start with SketchUP for the base model, and then move on to 3ds Max for the touch ups. In this phase we pay attention to keeping all the layers tidy, and the geometry clean – mostly made of grouped solids. This way, we would reduce the geometry problems that can occur when exporting form SketchUP to 3ds Max. We arrange the layers according to materials as another method of making our lives easier later on.
3ds Max
在SketchUP中完成模型后,我们将其移到3ds Max和V-Ray中。在这个过程我们经常做一些小修正,比如柔化原始模型几何形状、添加一些细节、点亮设施和家具。模型都设置好后,我们进入下一个阶段——点亮场景。
Upon finishing the model in SketchUP we moved on to 3ds Max and V-Ray. This is the phase in which we usually make smaller adjustments to the rough model geometry softening, adding some of the details, light fixtures and furniture. After the model was all set we moved on the next stage, which was the lighting the scene.
照明
设置照明的时候,我们更喜欢在一个白模中操作。因为它会帮助我们将照明孤立出来,这样我们就能把重点放在场景中光和影上午关系中。
我们使用一个阳光充足的HDRI贴图和vray太阳光。这样,我们将两者完美结合起来,HDRI创建了环境,而使用vray太阳光会控制整体效果。
Lighting
When setting up the light we prefer to work with a clay model, it helps us to isolate the lighting so that we could focus on the relation between light and shadow in the scene.
We used a sunny HDRI map joined with a V-Ray Sun. This way, we combined the best of two worlds, the atmosphere generated by the HDRI and the overall control you can achieve when using sun object.
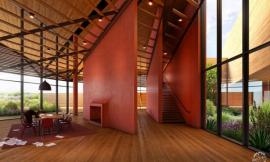
纹理
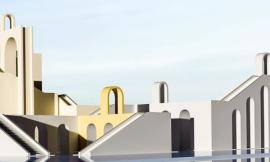
当太阳的组成部分被设置好后,我们开始给模型添加纹理。正如你所看到的,场景中只有很少的材质。我们使用的是基础材质,这样便于后期制作的基础渲染。当然材质的创建方式可以更灵活。
下图是场景中使用到的材质的预览:
Texture
When the position of the sun was set we moved on to texturing of the model. As you can see there are just a handful of materials in the scene. We used basic materials, as we wanted to have a good base render for post-production. The materials are created in a way that would allow more flexibility later on.
Here’s a preview for the materials used in the scene :
沙砾和是用Forest Pack Pro中的基本预设创建的。
The gravel and grass were created with Forest Pack Pro using basic presets.
构图
材料和灯光设置好后,我们开始转向选择正确的角度。我们试图将镜头框住,这样通过建筑轮廓能判断出距离。同时,我们试图避免出现中心透视,将边框向边上倾斜一点,使图看起来更随意,就像是抓拍的。
Composition
With the material and the lighting set we moved on to choosing the right angle for the visual. We tried to frame the shot so it leads into the distance guided by the lines of the buildings. At the same time we tried to avoid the central perspective and give the image a more casual, snapshot type of look by tilting the frame a bit to the side.
后期制作/Post Production
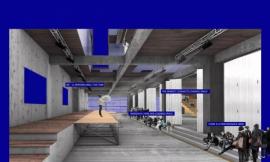
基础渲染
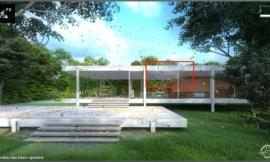
我们是以一个简单、普通的渲染开始。正如前面提到,我们的想法是创造一个轻盈、对比鲜明的原始渲染图,这样我们可以有更多空间来构图和后期处理。
Base Render
We started off with a simple, plain render. As we mentioned, the idea was to produce a lightly contrasted raw render, so that we can have more space for compositing and post-production later on.
基础校正
环境设置好后,场景的构图阶段也完成后,我们开始进行基础渲染校正。但是考虑到大多图都是由基础渲染图生成的,进行基础校正是一个不错的办法。我们使用一些V-ray路径进行校正。我们试图用GI路径增强细节,用原始反射路径进行反射。最后,我们又使用了更多的对比和更清楚的渲染。
Base Corrections
We usually work on base render corrections after the compositing phase of the scene after we set the environment. But considering the fact that most of the image was taken by the base render, it was a good idea to start from corrections this time. For the corrections we used a few V-ray passes. We tried to boost definition with the GI pass and reflection with raw reflection pass. We ended up with more contrast and a clearer looking render.
纹理
这个阶段我们开始引进更多的活跃性到基础材质中。我们经常搜索尺寸相似,但是有着明显阴影区别的纹理。我们通过设置视角降低其饱和度,这样颜色不会被抹掉。然后我们使用一个具体的混合模式来将它们混合起来。在这个特殊的场景,我们采用的是水泥、沙砾和耐候钢。
Texturing
In this phase we started to bring a bit more dynamics to the base materials. We usually look for textures that are similar in scale, but with distinct shadow contrast. We set them in perspective, usually desaturate them so that colors wouldn’t burn out, and then we use a specific blending mode to blend them in. In this particular scene, we worked on concrete, gravel and corten steel.
背景
关于背景,我们将原位置的建筑图和合适的天空图结合起来。天空材质和其他材质一样使用了相同的方式。找到好的光影图和活跃感很重要,因为颜色稍后可以很容易被校正。
Background
For the background we combined one of the photos of the building from the original location with a suitable sky. We blend in the sky the same way as the other materials. It is important to look for the fine shadow play and dynamics, as the color can easily be corrected later.
灌木和更多的草
这个时候我们收到了客户的反馈,要求我们在地面上用高的植被代替草。墙体上的洞也需要用草填满。这样,整个过程包括制作草材质和合适的灌木需要在Photoshop内完成。我们需要记住主要的一点就是场景中光影对比,使其和着色的几何图形相匹配。
Bushes and more Grass
At this point, we received feedback from the client, and we were asked to put in higher vegetation instead of the grass on the floor. Holes on the wall were also to be filled with grass, so the entire process involved playing with grass textures and masking them out with proper brushes in Photoshop. It is essential to keep in mind the shadow contrast of the scene, and match it on the painted geometry.
墙壁上的纹理
接下来,我们继续深化图象,所以我们增加了日常细节,比如耐候钢上的划痕和太阳能板上的反射光,这样使图看起来更自然。
Markings on the Walls
Next, we continued to go deeper into the visual, thus we added customized details such as drawings on the corten and flashes on the solar panels, to make the image feel a bit more natural.
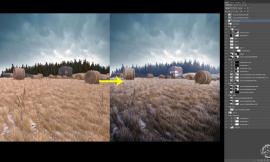
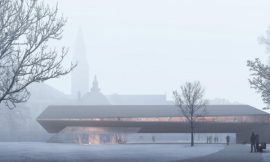
雾气和深度
到这一步图看上去完成的不错了,但是仍然有点平淡,所以我们开始添加一些雾气效果,并加强场景中的灯光和光影,这样就增加了更多的氛围和深度。也帮助我们凸显出场景的前景元素。
Fog and depth
At this stage the picture looked good but it was still a little flat so we started painting in the fog and emphasized lighting and shadows of the scene, to add a little more atmosphere and depth. It also helps to pop up the foreground elements of the scene.
人物
图已经达到了一个得体的层次,所以接下来就是添加人物进来。经过一些考虑后我们决定加入一个平静的但带有一点浪漫的设计。将人物设计为合适的比率并安放在恰当的角度,并添加一些光影,巧妙地做出回避,在色彩的处理上也使用一些小技巧,使其和其他元素想匹配。
People
The image was at a decent level so our next step was to add people in. After some consideration we decided to go with a peaceful yet a bit romantic layout. After proper scaling and setting them in perspective, we painted in shadows, did some dodging and burning and played around with colors to fit them into the composition.
最后校正
每一个步骤都设置好了,现在就进入了最后阶段:
渲染图的颜色看上去有一点不均匀,所以第一步就是涂一点蓝色,使天空和其他元素的色彩均匀。
Final Corrections
Everything was set for us to move on to the final phase :
The colors of the image looked a bit uneven so the first step was to paint in a touch of blue to even out the sky and the rest of the image.
我们做了一些巧妙地回避和加强来凸显整个阴影和光的丰富性,使图显得很突出。
We did some dodging and burning to bring out the overall shadow and light dynamics and make the image pop out a little more.
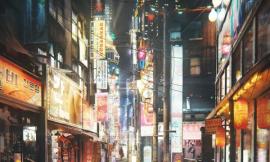
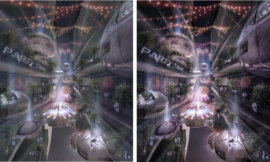
到现在为止,图看上去很棒了,但是我们想添加一点暖色调和聚焦,所以我们使用了一个暖滤镜和一个分散滤镜,制造一种暖模糊和分散灯光效果,也使用了一个光晕来聚焦其中心。
So far the image looked great, but we wanted to add a little more warmth and focus so we used a warming filter and a diffuse filter to give it a warm haze and diffuse the light, as well as a vignette to center the focus.
这就是你最终看到的渲染图。
也呈上一个精彩的视频……
希望大家过的愉快。如果有任何问题,尽可以在下面的评论栏里提问。
So there you have it!
And in a nice video too…
We hope you had a good time reading this article. If you have any questions, feel free to ask in the comment section below.
出处:本文译自www.ronenbekerman.com/,转载请注明出处。
|
|