由专筑网韩平,刘庆新编译
不久前,我认识了Matthias Buehler,他跟我分享了他自己的关于“贫民区”的项目,这使我非常感兴趣。Matthias在ESRI(美国环境系统研究所公司)工作,在CityEngine项目中担任3D产品工程师,该项目的幕后有许多很酷的元素,而且我很渴望学习这些。在本篇文章中,Matthias描述了耗费他和他的朋友Cyrill Oberhaensl长达两年半业余时间的生成程序的创建的“技术”过程。一起欣赏吧!
Matthias Buehler approached me not long ago, sharing his personal project ‘Favela’ which immediately got me curious. Knowing Matthias works at ESRI as 3d Product Engineer involved with the CityEngine project I knew that some cool stuff are going on behind the scenes and I was eager to learn more about it. In this article, Matthias describes the rather ‘techy’ process of the procedural generated creation he and his friend Cyrill Oberhaensli went through over a span of 2.5 years working on it in their spare time. Enjoy!

作者:Matthias Buehler
Matthias Buehler,3D产品工程师,ESRI公司研发中心,苏黎世
项目团队:
• Matthias Buehler
• Cyrill Oberhaensli
灵感:
这个项目的灵感来源于我三年前所见到的“不一样的平民区”,也是3D城市竞赛的作品。在我完成了所有的细节之后,我觉得我可以完成的更好。不久,我就邀请了一个从事3D建模较早的朋友Cyrill Oberhaensli加入我的项目。我们都没有遇见这个项目会伴随我们两年半.......
Author : Matthias Buehler
Matthias Buehler is a 3D Product Engineer at Esri R&D Center Zurich.
Project Team :
Matthias Buehler
Cyrill Oberhaensli
Inspiration
The inspiration for the project was a different Favela rendering I had seen about three years ago. It was a submission for a 3d city competition. Having studied all the details, I thought to myself that this could be done better. Soon after, I asked my friend Cyrill Oberhaensli, who had started with 3D just a bit earlier, if he wanted to join me for the project. We did not foresee that this would go with us for the next 2.5 years…

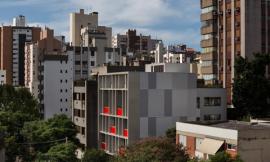
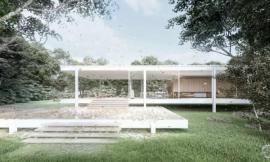
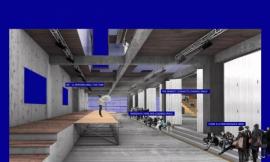
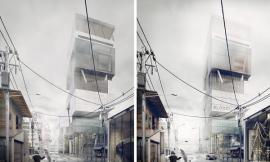
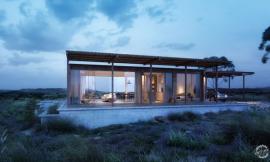
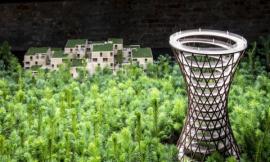
以上是整个平民区的模型渲染,下面是贫民区的微型模型。
Above is the rendering of the full-scale Favela model and below is the miniature scale Favela model.

下面是该项目的一段简洁的概述:
Here’s a brief overview as well :
目标
在这个项目开始的时候,我已经在CItyEngine的开发团队担任了两年的产品工程师,显然我在工作中我并没有时间去做这么具体的项目,所以我利用我的课余时间。它不光是我之前所积累的技巧的完美呈现,还应该有所突破。
第二个也是更为重要的方面是展示CityEngine作为城市设计工具的优越的潜力。对大多数城市设计者来说,CityEngine还是未知的,所以这个项目应该展现该软件在研究和开发各种尺度智能城市模型的潜能。
在效果图方面,我们从以下限制选择了Maxwell渲染,我已经使用了很多年,而且只需要简单的操作就能得到高品质的图像,再也不用担心设置和调整。遗憾的是,有些看过这些图像的建筑师认为这只是对贫民区居民生活的乏味的展现......然而,最遗憾的就是有些人只是看到眼前的景象,并未深入幕后。
程序式的建筑
该项目的核心是建筑和街区的程序生成。在CityEngine中,所有几何体的生成都由CGA-CityEngine特有的脚本语言写成的规则代码所决定。程序式模型建筑的艺术是探索建筑语义上的本质,以及将此转换为CGA的代码。建筑的代码基本上是定义建筑类型的本质及它如何在所有可能的场景构建。
Goals
I’ve been working on the CityEngine development team as a product engineer for 2 years by the time the project started and obviously never really had the time to do such a detailed project during work, so I started it in my spare time. It was supposed to display the culmination of all the know-how I had collected so far, but it went a lot further.
The second and more important aspect of it was to show the sheer potential of CityEngine as a tool in urban planning. CityEngine is still unknown to most city planners, thus this project is supposed to show the potential of the software to study and develop smart city models in all scales.
For the renderings, we chose Maxwell Render by Next Limit, which I have used for years and years and simply produces the best quality images without having to worry about setup or tweaking, which I so dearly hate. Sadly, some architects that have seen the images of this project just thought it was a ‘tasteless elitist mockery’ of the people who actually live in Favelas… It’s not! It’s sad to see that some people just read bad things in what they see.
Procedural Buildings
The core of the project was the procedural generation of the buildings and streets. In CityEngine, all geometry is generated by rules, which are written in CGA – CityEngine’s proprietary scripting language. The art of procedurally modeling buildings, is to find the ‘essence’ – the semantics of the architecture, and to translate those into CGA code. Writing such code for a building is basically defining the nature of an archetype and how it is constructed in all possible scenarios.

建筑体量
在我仔细的研究了许多参考图像后(加上一些实验,错误和演示),我最后摸索了令我满意的模仿分配建筑体量的设置命令。我增加了一系列各种楼层、障碍、体量改变和转化,并增加了使体量适应环境的额外代码。
质量研究
Building Volumes
After having studied many reference images carefully (plus a bit of trial and error and playing) I came up with a rule set which mimics the distribution of building volumes I was happy with. I added variety in number of floors, setbacks, volume changes and shifts, plus added code that makes the volumes adapt to the terrain.
Mass studies :

底面平坦的或倾斜的楼层体量(黑/白):
Floor volumes with flat and sloped bottom side (black / white) :

立面图书馆
我搜集了60个有着相同灰砖、红砖及灰泥外墙的正立面作为我们的参考图像。每个图像都经过人为的处理并经过CityEngine的立面导向生成60个可以适应任何立面宽度,产生体现外观的命令。
在模型的生成、删除、重复及各体量部分适应定位尺寸的过程中,根据宽度的不同,产生了模型的分裂。
图书馆的全立面分3层高度的变化:
Facade Library
I gathered 60 images of individual facades (1 floor high each), with the same statistical distribution of grey brick, red brick and plaster facades, as found in our reference images. Each image was manually cleaned up and processed in CityEngine’s Facade Wizard to get 60 rules that produce a volumetric facade representation, which can adapt to any facade width.
Depending on the width, the splits that happen during the model generation, delete, repeat or scale individual parts to adapt to the given dimension.
The full facade library, assigned to 3 floor height variations :

该规则可自动适应任何给定的立面宽度:
The rules automatically adapt to any given facade width :

所有的60种CGA立面命令经过手动处理额外产生了一些多边形,这是我首次定义哪些元素代表窗户,哪些元素代表墙。这些多边形也可以作为终端来定义那些可以分散典型元素的区域。元素主要包含管片段、交流电、电缆连接器或者随机剥离灰土。
绿色——潜在电缆连接的区域;红色——立面细节的分布区域
All 60 CGA facade rules were then manually post-processed to additionally produce polygons, where I first defined, which elements represent windows and which wall. Those polygons then were taken as further input, to define, where typical elements for each region can be scattered. Elements such as pipe fragments, AC’s, electric cable connectors or random peeling-off plaster.
Green – Areas of potential cable connections, Red – Distribution of facade details :

物品
将分散在整个城市的物品进行传统的建模和UV映射,大部分工作由我的朋友Cyrill在Cinema4D中完成,少部分由我再玛雅中完成。他们尽可能的被建成低聚模型来保证整个城市模型的合理多边形计数。当然,分配本身也是被命令所驱动的。无论是:
• 每一种物品可能出现的场所,例如……
• 物品的类型如何界定。
有些物品十分随机的摆放(比如砖、草垫子),但有些通常是有规律的出现的,比如电箱或垃圾袋。
在任意多边形区域内,规则驱动着物品的分配。
Assets
The assets that are scattered throughout the city were modeled and UV mapped traditionally, mostly by my friend Cyrill in Cinema4D, and some by myself in Maya. They were modeled as low-poly as possible, to keep the poly-count for the whole city model reasonable. The distribution itself is of course also rule-driven, both for :
• where which assets can appear, as also…
• how the asset types are clustered.
Some assets are rather ‘individual pieces’ that lay around (e.g. bricks, pallets), while others usually appear in a ‘geometric array’, such as electrical boxes or trash bags.
Rule-driven asset distribution on any polygon :

分布特写:低聚物品:
Distribution closeup: Low-Poly assets :

我们在做每一个纹理的时候都手动创建一个法线贴图和粗糙度贴图。对于多数颜色贴图来说,我们在色彩上创造了一点变化。所有城市模型加上室内场景——我们完成了1070个纹理制作。
左——颜色贴图;中——法线贴图;右——粗糙度贴图
For every texture we made, we also manually created a normal map and a roughness map. For most color maps, we created a few variations in color. All together – city model plus interior scene – we ended up with 1070 textures!
Left – Color map, Middle – Normal map, Right – Roughness map :

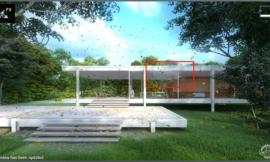
所有贴图的材料渲染测试。注意玻璃灰色球的反射。
Material test render with all maps. Notice the reflection of the grey balls in the glass :

程序式植被
该项目中所有的植被都是自制的。当然如果我们使用专用软件,这些单个的植物一定会像特写镜头里那样好看。但是这只是展现CityEngine能力的一小部分。
我创造了一个“植物生成器”的CGA命令,该命令包含了100个参数来调节我们所需的植物的各方面,如树干半径,分枝长度,分枝的代数(分枝上的分枝)及每个树枝上的叶片的数量。甚至重力和每个树枝的类型LOD(多层次细节)都能在系统中建立。通过不同参数,我们可以模拟不同种类的植物……从草到到灌木到棕榈树再到高度细节的阔叶树。
尽管系统采用随机生成模型,但并不是每一处变化都那么自然。所以,我在使用植物生成命令是对于贫民区所需要的植物每种只生成5例,并进行分散布置。
分枝代数:左1;中2;右3.
Procedural Vegetation
All vegetation in the project is self-made. Of course the individual plants do not look as nice on closeup as if we had used a dedicated software. But again, this was part of demonstrating the capabilities of CityEngine.
I created a ‘plant generator’ CGA rule that has about 100 attributes to drive every aspect of the plant I needed, such as trunk radius, branch length, number of branch generations ( branches on branches ) or the number of leaves created on a twig. Even gravity and a ‘per branch type’ LOD is built into the system. Depending on the attributes, different plant species can be mimicked… from grass to bushes to palms to highly detailed broadleaf trees.
Since the system generates purely random models, not each ‘seed’ (not every variation) looks very natural. Thus, I used this plant generator rule only to generate 5 instances of each species we needed in the Favela, which we then instanced using a separate vegetation distribution rule.
Number of branch generations: Left: 1 | Middle: 2 | Right: 3

重力对树干的影响:左:0.5;中:10;右:20
Influence of gravity on trunk: Left: 0.5 | Middle: 10 | Right: 20

电线和晾衣绳
贫民区有许多悬挂的东西,为了简单起见,我们决定只应用两种线绳:电线和晾衣绳。
每个建筑模型和木质电线杆需在在CGA中反映潜在的连接点。这些报告包含空间位置加上他们的法线向量,几何(如立面)相对位置。通过使用python脚本,我可以收集所有显现的连接点,并将它们相互连接。接着我使用过滤系统过滤“坏”的连接,取决于:
• 距离(太近或太远)。
• 角(电缆没有连接到一个正面斜角度或从背后)。
• 每点允许的最大连接数
一旦所有的配对都找到,我便通过计算垂曲线来创建线缆几何,无论是普通电缆还是晾衣绳都样的。
Python脚本:从潜在的连接点创建电缆
Cables and Clotheslines
Favelas have lots of things hanging around. For simplicity reasons, we decided to just use 2 types of cables : electric cables and clotheslines.
Each building model and wooden power line pole reports potential connection points in CGA. These reports include the location in space plus their normal vector, relative to the geometry (e.g. the facade). Using a python script, I can collect all potential reported connection points and compare them with each other. Then, I use a filtering system which filters out ‘bad’ connections based on :
• distance (too close or too far).
• angle (cables don’t connect to a facade at glancing angles or from behind it).
• maximum allowed number of connections per point.
Once all ‘pairs’ are found, I compute the catenary curve and create the cable geometry, either for plain cables or cables with hanging clothes.
Python Scripting : Creating cables from potential connection points.

Python脚本:晾衣绳
Python Scripting : Clotheslines!

管线脚本
我花费了大量的时间在管线上在,这也使我更有效的高质量的进行测试渲染。因为CityEngine是一个建模工具,所以具备渲染开关。我深知如果能够创建贫民区的各种变化形式,我们将非常欣慰。因而,我希望在特定的位置,可以将在CityEngine中生成的一些模型,使用玛雅在一分钟内进行渲染。
我已经使用了一些方法,但由于一些bug或其他问题,并没有成功。
最终,我采用以下4步解决了管线问题。每一步都是由一系列脚本所表达,都是用CityEngine’s 脚本 ‘native’ 脚本, Maxwell 渲染pyMaxwell 和玛雅的MEL写成的。
1. 基于OBJ格式的几何形体输出和解析
所有的几何形体都写成OBJ文件格式。我之所以选择该文件格式是因为这是我可以完全掌握的ascii文件格式。这也使我可以改变几何形体和材料的结构。
2. MXM创新
尽管我们使用Maxwel进行渲染,但并不想直接使用任何默认材料,因而我决心找到一种方法可以将默认材料转化为Maxwel可以自身消耗的MXM材料。最终,我创建了一个Python脚本。它可以将解析材料并自动创建新的pyMaxwell代码,一旦运行就会为每一个存在的材料创建单独的MXM文件。这样,我可以控制材料类型的各个方面——从金属表面到矿物质表面再到落叶和萧条的草地等。
3.MEL加载器
MEL的原理十分简单,它从一个特定的文件夹中载入所有OBJ文件,搜索MXM相关的材料并用最终的MXM文件替代默认材料。
4.植被
我设计了3种方法将植被转入玛雅中。
• 完整的几何形体——这是最原始的方法,弯曲忽略实际强制以多边形形式写出植被。总共有155百万个多边形,操作起来十分机械,而且该方法并不可行。因为场景的创建需要45GB的渲染内存,而测试渲染需要64GB内存,剩下只有32GB内存。我必须找到另一个途径,使渲染峰值控制在21GB.
• 基于几何形体分散植被——这是三种方法中最简单的:我只需要在基础的几何形体中写出我所需放置的植被的位置,然后使用Maxwel渲染器3.0中“分散”几何形体修饰器来尽可能多的在基础的几何形体中分散植物。而且我将基础几何设置为在镜头和GI中隐藏,所以我并不需要渲染。
• 将实际位置转化为粒子系统——基于CityEngine系统,所有的植物(包括阳台上的盆栽)都基于规则来放置,这就使得每种植物的位置都能精确的保持。因此,我创建了可以直接产生MEL代码的机制,用来存储每种植物的精确位置和分散情况。当我在玛雅中运行该代码时,每种植物都会以粒子系统的形式出现。我喜欢用代码来表达代码,因而通过粒子形式产生随机序列。
在玛雅的最终数据设置中,我采用了第二和第三种方法的结合:对于草丛采用基于几何形体的分散布置,对于其他的上千种植被采用粒子系统。
玛雅:所有植被选择的粒子系统。
Scripted Pipeline
Most time I have invested in a pipeline that lets me efficiently do test renderings in final quality. Since CityEngine is a modeling application, there obviously is a tool switch involved, when the time is ready for rendering. I knew we’d be creating lots of different variations of the Favela before we’d be happy. So I wanted to have a process in place, where we can go from a few generated buildings in CityEngine, to starting a render in Maya within one minute.
I had played with different approaches. Some of them did not work due to bugs and other issues.
In the end I settled with the following 4-step pipeline. Each step is represented by a series of scripts, all written in CityEngine’s Python, ‘native’ Python, Maxwell Render’s pyMaxwell and Maya’s MEL.
1. OBJ-Based Geometry Export and Parsing
All geometry is written to the obj file format. The reason why I chose this format is because it’s an ascii file format, which I can fully parse. This allows me to alter the structure of all geometry and materials.
2. MXM Creation
Since we were using Maxwell Render and did not want to stick to any default material translations, I decided to find a solution to translate the default materials myself to the MXM materials that Maxwell consumes natively. For this, I created a python script which parses the material definition and automatically creates new pyMaxwell code, which when run, produces a separate MXM file for each material found. That way, I was able to control every aspect of the material types I needed – from metallic surfaces to mineralic surfaces to leaves and grass with thin-leaf SSS.
3. MEL Loader
This MEL script is quite simple, it loads all OBJ files from a specific folder, searches for the according MXM material and replaces the default material with the final MXM file.
4. Vegetation
I designed 3 ways to port the vegetation to Maya :
• Full geometry – This original approach I took was to completely ignore any instancing and go brute force: Simply writing out everything as polygons. That is 155 million polygons. That worked fine technically, but it turned out this was not a feasible approach, since the scenes produced needed about 45 GB of RAM to render. Test renders ran fine on my 64 GB RAM machine, but since all other 13 machines we had to render on only had 32 GB of RAM, I absolutely needed a different approach, using instancing (The final renders peaked at 21 GB).
• Base geometries to scatter instances on – This is the simplest of the three approaches: By just writing out the base geometry on which the vegetation instances should sit on, I was able to use the ‘scatter’ geometry modifier of Maxwell Render 3.0 to scatter massive amounts of instances on these geometries. The base geometries themselves I set to ‘invisible to camera and GI’, thus don’t render.
• Reported instance positions to particle systems – Since in CityEngine, all vegetation (including potted plants on balconies) is placed in a rule based manner, it was crucial to have a way of keeping track of the precise position of each plant. For this, I created a reporting mechanism that directly produces MEL code that stores the lists with the precise locations, separate for each type of vegetation. When running that code in Maya, for each type of vegetation, an individual particle system was filled with particles, representing each individual plant. I love creating code with code! The random rotation was achieved by a particle expression.
For the final data-set in Maya, I used a combination of the second and third approach: Base geometries to scatter instances of grass clumps (about a million of them), plus many thousand other instances via particle systems.
Maya : Selected particle systems for all vegetation types :

爱好者之家
创建完成3D城市模型是一项非常艰巨的任务,而且永远不会有完成的一天。在花费了大量的时间进行CityEngine全景模型的制作后,我们始终觉得这座城市略显萧条。没有汽车、自行车、居民、动物、灯光等等。我们俩都深刻意识到这个问题,并决心改变,从现实出发:
• 该城市缺乏许多元素……
• 描述我们完成这个项目的过程。
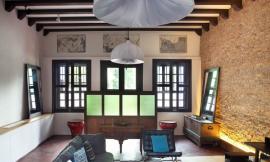
因此我们想出了“爱好者之家”这个概念,在这里我们模拟人类建造了虚拟的贫民区的物理模型。如果你仔细研究该模型,一方面可以看到模型还未完成,另一方面暗示了化肥我们两年半的项目还将继续进行下去。
在爱好者之家中,我们放置了许多物品和项目中收集的渲染场景。对于我们来说,“过程比结果更重要”。Cyrill使用Cinema4D建立了许多室内模型。他的模型非常棒,每件物品都具备大量的细节。他总是提醒我“斜面增加额外的花费”。
再次感谢Cyrill Oberhaensli赞助了他独立制作的游戏‘Bunker 16’的收益。如果你够大胆就去玩这个游戏吧。
玛雅:爱好者之家的鸟瞰图
Hobby Room
Creating complete 3d cities is a daunting task and can never really be called ‘done’. After having invested a lot of time already in the full scale CityEngine model, we were still a bit unhappy that the city still looks a bit ’empty’. Cars were missing, bikes, animated people, animals, lights and countless other things. Fully aware of the fact that by just the two of us, we’ll have to live with this, we decided on a story that is both okay with the fact that :
• The city is missing some elements and…
• depicts the journey we had creating the project.
That’s how we came up with the ‘hobby room’ idea, where fictional people build this fictional physical model of a Favela. When studying the model carefully, one can see that the model is not yet completed – an other hint to the ‘WIP’ character of our project that took 2.5 years.
Throughout the whole hobby room, we placed objects and test renderings that we had collected during our journey. Thus, for us, the project represents the saying ‘the journey is the reward’. Cyrill modeled most of the interior, all in Cinema4D. He did an amazing job, modeling everything with enormous detail. And often, he reminded me that ‘bevels cost extra’!
Thanks again to Cyrill Oberhaensli, who provided some of the assets of his own indie game ‘Bunker 16’. Play it, but only if you’re not easily scared…
Maya : Perspective overview of the hobby room model

更多室内细节:
And more Interior Details :


动画
我们本打算制作40秒的动画。我们整理了所有场景,布置了动画相机(镜头对焦,相机移动形成动画)。我们使用14台机器进行渲染。长达两周的工作后,我们在评估了画面质量后决定放弃动画,主要是因为我们很难处理帧与帧之间的杂音分布,尤其是由于场地的深度所产生的难以对焦的反射表面。因此,我们采用了一系列剧照。
结论
当然,这整个项目都偏“技术”,但是它也证明了,作为创建者,我们可以完成什么以及我们开始这个项目的初衷:展现CityEngine的潜力。
Animation
We had planned to do a 40 second animation of the ‘Favela’. We had all shots sorted out, had the cameras animated (camera move, plus animation of camera focus) and started to render on our 14 machines we had access to. But after about 2 weeks, we evaluated the footage and had to give up the animation, because we struggled with noise distribution issues between the frames, especially on highly reflective surfaces that are strongly out of focus due to the heavy depth of field, as we have it. Thus, we decided to simply go for a series of stills.
Conclusion
Yes… The whole project is a bit ‘tech-oriented’, but it proves to us, the creators, what we’re capable of and it clearly shows my original reason to start the project : To show what can be achieved with CityEngine.

出处:本文译自www.ronenbekerman.com/,转载请注明出处。
|
|