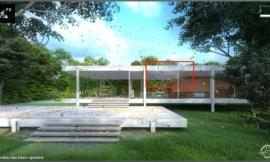
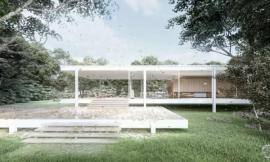
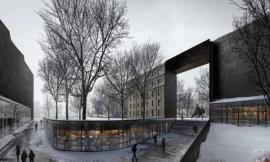
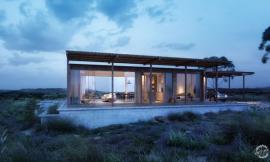
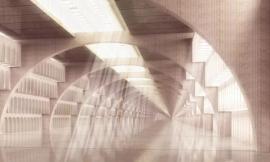
Juan Carlos Torres获得了“2014年第6周最佳渲染”奖,因为他的设计中图的构成元素很好,而且很好的传达了他所想表达的森林住宅的寒冷多雾的视觉效果,使设计很好地与森林环境相融合。跟随本文一起来看Juan描述他如何使用3 dsmax和V-Ray创建这个场景,以及末尾处的一些额外的镜头吧。
Juan Carlos Torres‘s cold and foggy visuals of a House in the Forest awarded him Best Visualization of the Week NO. 06/2014 for the great composition and mood he managed to convey, blending in the design so nicely with the forest environment. Follow this article as Juan describes his process of creating this scene using 3dsmax and V-Ray, with some extra shots at the end. Enjoy!
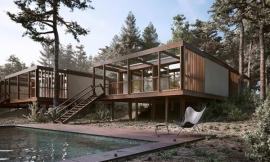
Architecture and Conceptualization
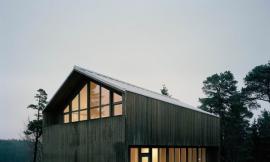
The intention was to design a low-impact house for a single person in the middle of the woods. The house was designed to blend into the environment, with bare concrete as the main material selection.
Large spans were used as windows, as if they are clean openings for allowing light in and view out, in what is otherwise dominant concrete forms. I was aiming for a cold and foggy environment that plays well with the concrete as main material of the house and helps blend it all together.
Modeling
The architectural geometry was modeled in AutoCAD (I know… don’t ask). The primary units are centimeters, principally for the low poly solids, and the result was a very light model , this will give me a lot more versatility in the rendering stage.
Units Setup in 3dsmax
The first step in 3dsmax is the units setup , I configure this in centimeters for both the display and the system. I’m importing the model via the file link manager feature which allows a faster refresh of the model when needed.
Gamma and LUT设置(LWF)
开始线性工作流程,将3 dsmax的Gamma and LUT数值设置至2.2更能显示出真实的色彩和纹理,光线也需要做纠正调节。
Gamma and LUT settings (LWF)
I started the Linear workflow process setting the gamma and LUT to 2.2 in 3dsmax to visualize real colors and textures, and the lighting is correct too.
Lighting and V-Ray Physical Camera Settings
The lighting of the scene is a V-Ray Dome light with an HDRI by Peter Guthrie, linked with a V-Ray Sunlight to get strong shadows and a little warm highlights.
V-Ray物理相机设置:
The V-Ray Physical Camera Settings :
这是覆盖材料后的第一个光线测试。
Here′s the first light test with an override material…
Texturing
The principal materials are the concrete and the ground, for both I used textures from CGtextures, modified in Photoshop and color correction inside of V-Ray material editor.
Landscaping
I used species from different companies for the landscaping, the grass and small species are from iCube R&D, the medium species are from Evermotion , and the trees are from VIZpeople Birch collection.
石头是用岩石生成器生成的。
The stones are modeled with rock generator script.
I used MultiScatter plugin to create the environment, in the case of the trees and medium species I used a border spline around the house to limit the entry.
The first plane trees was located manually using V-Ray Proxies.
V-Ray Environment Fog
This step is really hard because the tests are very long. I recommend turning off all the scatters and turn on the override white material for the tests.
Create basic geometry like primitives around the scene like trees. The V-Ray atmosphere element will help us to tune the in the post-production process.
Don’t forget turn on the optimized atmospheric evaluation in V-Ray System – miscellaneous.
最后设置
Final Settings
后期制作对V-Rayrender elements面板的设置:
The V-Ray render elements for the post-production process :
Post Production
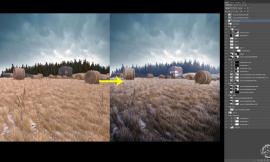
I used Photoshop for the first post-production session , adding render elements to improve reflections , contrasts , fog, leaks, in screen mode and soft light blending modes.
The first PS breakdown :
I hope this information will be helpful to you. Special thanks to Ronen for selecting my work as a forum spotlight and pushing towards the realization of this making-of .
Feel free to ask anything in the comment section below.