Making of Astridhof Residence
由专筑网刘庆新,杨帆编译
最近,Patric Verstraete发表了他最新的作品——VEELAERT ARCHITECTEN的Astridhof住宅项目,展示了在不依赖摄影的条件下,仍能用大量的环境工作在基地中达到相同的效果。他给我们分享了以3dsmax和V-Ray作为主要工具的制作过程,其中也用到了Forest Pack Pro,RailClone和Mighty Tiles Pro。
Patric Verstraete recently published his latest work for VEELAERT ARCHITECTEN’s Astridhof Residence project, showcasing extensive environmental work to achieve similar look to that on site without relying on photography. He kindly shares his process of making it using 3dsmax and V-Ray as his main tools, as well as Forest Pack Pro, RailClone and Mighty Tiles Pro. Enjoy!
简介/Introduction
受Ronen Bekerman邀请写下这篇“制作”过程的博客时,心情非常奇妙。在这里我学到了很多,也成为我灵感的源泉。
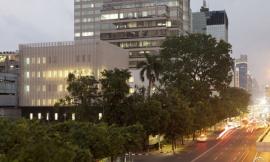
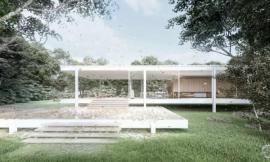
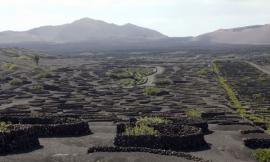
ASTRIDHOF住宅位于比利时一个美丽的森林环境,是由VEELAERT ARCHITECTEN设计完成的。
It is a fantastic feeling being invited by Ronen Bekerman to write an article for the ‘Making Of’ section on this Blog – Where I’ve learned so much from, and which has always been a great source of inspiration for me.
ASTRIDHOF Residence is situated in a beautiful wooded surroundings in Belgium and designed by VEELAERT ARCHITECTEN.


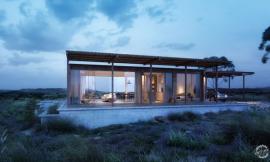
该建筑的设计和定位充分集中在西南向的开放空间。建筑偎依在这里,与高大成排的树木形成鲜明对比。依据这里的地形,建筑通过一点完全形成连续的直线,其细节强调了建筑显著的水平状态。
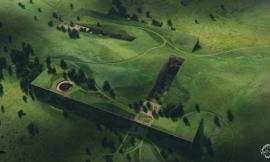
设计师特意强调了带有环境的整体设计,使其尽可能成为景观的一部分。
项目用到的插件有:
• 3ds Max 2014
• V-Ray 2.40
• Mighty Tiles Pro
• Forest Pack Pro
• Laubwerk Plant Kits
• RailClone
• Photoshop
The design and positioning of the building is fully focused on the south-western open space. The building nestles as it were, against the tall tree line. It forms a continuous line with a slight bend based on the shape of the terrain with materialization and detailing that accentuates the strong horizontality of the building.
The architects strongly emphasized the need to show the integration of the design with the environment, making it part of the landscape as much as possible.
For this project I used :
• 3ds Max 2014
• V-Ray 2.40
• Mighty Tiles Pro
• Forest Pack Pro
• Laubwerk Plant Kits
• RailClone
• Photoshop
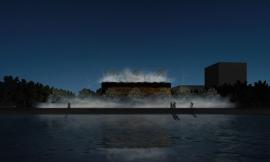
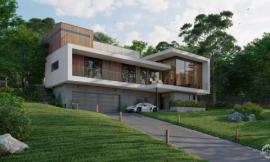
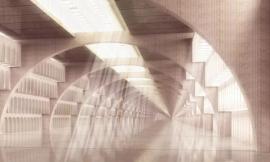
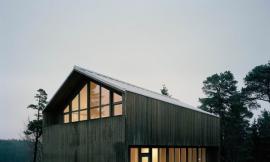
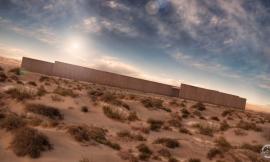
制作完成的室外渲染图:
Here are the exterior visuals made in this project :


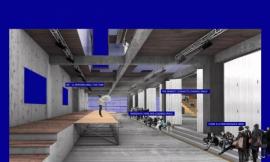
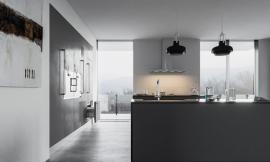
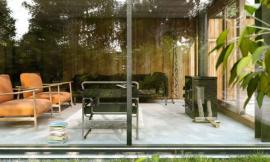
室内渲染图:
And interiors I’ve recently completed too :


基础场景设置:/Basic Scene Setup
下面是我经常用到的一般场景设置。
Here are the general scene setup settings I always use.

建模/Modeling
我在3dsmax中制作了平面图,形成一个装置,我可以将其应用到我的建模过程中。我将单位设置为米和厘米。确定好平面的尺寸很重要,这样建模时才能获得正确的比例。
I arranged the plans inside 3dsmax to form a rig to which I can refer to in my modeling. My Units are set to “metric” and “centimeters”. It′s important to check the measurements of the plans to get the right scaling of the house.

我使用非常简单和基本的多种编辑模式来创建模型。我必须小心翼翼地在不同层加入每一处地面的所有元素,这样有利于更加方便得工作。客户要求室内层次的使用也要更便捷。
I used very simple and basic poly editing method for creating the model. I had to carefully put all the elements of each floor in different layers, so it would be easier to work on. The client asked me for interiors as well which made the use of layers even more handy.

从上图你可以看到图层结构。
Below you can see the layer structure.
用RailClone建模/Modeling with RailClone
关于阳台上的玻璃扶手,我使用了省时插件iToo Software RailClone。我只需要创建一个样条,附上几何学。在制作过程中,阳台的设计改变了两次,我需要做的就是改变基本扶手单元模型,用其构成的链状结构就都改变了。
For the glass railings on the balcony I used the time-saving plugin by iToo Software RailClone. I just needed to create a spline, and attach the geometry. The design of the balcony changed twice during the time I was working on the project, and all I had to do is change the basic railing unit model and it all changed on the fly.

制作平台屋顶也使用了同样的方法。先创建了几个样条曲线,在上面附上一部分石头材质。关于怎么制作的教程可以访问RailClone Parquet Flooring Tutorial。
I did the same for the terraces, creating several splines and attaching a stone segment to them. For a good tutorial about how to do this, visit the RailClone Parquet Flooring Tutorial.

该项目最大的挑战就是墙面的制作。使用一种纹理材质不是问题,因为Outdoor Wood Concept 中的木板会展示多次或特写镜头。
The biggest challenge was the wall cladding. Using a texture was out of the question because the Wooden Boards from Outdoor Wood Concept will show up multiple times and in close-ups.

这就是RailClone真正所起的作用,允许我将单一木质元素分配到任何我需要的样板中。
This is where RailClone really came to my rescue, allowing me to distribute the single wood elements adapting to any spline I gave it to follow.

灯光设置/Lighting Setup
场景设置非常简单,就一个来自VizPeople的带有HDRI 材质的V-Ray半球灯来进行照明。
The scene setup is quite simple. Just a V-Ray Dome light with an HDRI texture from VizPeople for the global lighting.


关于白天的情景,我需要全部控制住所有树木投射到建筑上的阴影。为了完成这一步,我决定使用一个目标方向灯来作为太阳。
For the daylight scenario I needed to have full control over the shadows of all the trees falling on the building. To accomplish this I decided to use a targeted directional light, which was used as a sun.

相机设置/Camera Setup
根据大概的观点想法,我通常建立一系列不同相机,来得到一些有趣的画面。在项目准备过程中,我经常制作一些粗略的草图。构成大部分以建筑的动态角度为基础。
Usually, I put up a bunch of different cameras based on a rough viewpoint idea to get some interesting frames. During the preparation of the project I already made some rough sketches for the images I had in mind. The compositions are mostly based on the dynamic perspectives of the building.


环境设置/Environment Setup
另一个挑战就是在建筑周围种植树木。我使用iToo Software 中的神奇的Forest Pack Pro插件,用R&D iCube中的模型来制作散落的植被。
The next big challenge was the planting of the forest around the building. I used the marvelous Forest Pack Pro plugin by iToo Software (again) for scattering the vegetation with models mostly from R&D iCube.

为了在模型上体现出更多的植被纹理和颜色的变化,我使用Forest Pack Pro中的颜色贴图。这个特性创建出的植被比较逼真,颜色也多变。
In order to have more variations of the textures and colors across the models, I used a color map in Forest Pack Pro. This unique feature allows you to create great looking and unlimited variations of color to the vegetation.


我想要后面的草坪体现出带状特点,也想展示出被带有重轮子的割草机修剪过的形态。所以我在iToo网站上再次发现一个好的教程——Forest Pack Football Field Tutorial。
I wanted the lawn-grass at the back to have the characteristic stripes, often seen when a lawnmower with a heavy roller is used. Again, I found a good tutorial about that on the iToo website – Forest Pack Football Field Tutorial.

纹理/Texturing
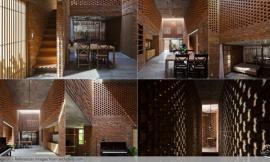
对于建筑北面,我需要使用好的砖块材料。我找不到任何砖块的纹理,所以我决定自己在Photoshop中绘画,并使用新的插件Mighty Tiles Pro创建大面积的部分来形成全部的砖块纹理。
For the north side of the building I needed a good-looking material for the bricks (Heylen Trading Bromo). I couldn’t find any good texture of this brick, so I decided to paint it myself in Photoshop, and used the new plugin Mighty Tiles Pro to create a large section of it to form the full bricks texture.

用Mighty Tiles PRO制作纹理
这部分我要对Mighty Tiles Pro的工作流做一个简单的介绍,并介绍一下Mighty Tiles Pro是关于什么的。
Mighty Tiles Pro是一个插件,能创建程序地板和墙壁纹理材质(或者是其他程序外观元素)。
在diffuse通道栏里引进Material/Map Browser后,我开始选择Mighty Tiles Pro纹理贴图来创建材质。
Texturing with Mighty Tiles PRO
In this section I will give a brief introduction on the workflow of Mighty Tiles Pro, and what it is all about.
Mighty Tiles Pro is a plugin that creates procedural floor and wall textures (or any other type of element that can benefit from the procedural aspect).
I’ve started the material creation by selecting the Mighty Tiles Pro texture map after clicking on the diffuse slot to bring up the Material/Map Browser.

在这里你可以从众多的样式中进行选择,你还可以在里面定义墙砖的宽度和高度。在该案例中宽度是21厘米,高度是5厘米。
Here you can choose between a vast amount of patterns, where you also define the width and the height of the tiles, in this case 21cm wide and 5cm high.

点击“Tile set”按钮调出“Tile set designer”选项。
Clicking (see image) on the “Tile set” button to bring up the “Tile set designer”.

过程很简单,拖放单个或多个图或包含图的整个文件夹,放入Mighty Library的侧边栏里。
The process is easy with dragging & dropping single or multiple images or entire folders containing the images you want to import to the sidebar of Mighty Library.

将它们拖放到瓦片集中。
Drag & Drop them in the Tile sets.


最后,我选择了瓦片集,将其放入Tile Set Designer中。
Finally, I’ve selected the tile set, and drop it in the Tile Set Designer.

现在通过选择Material Map/Browser中的Mighty Tiles Pro Map Selector,你可以添加凹凸贴图和反射纹理。
这里有要生成的贴图类型可供选择。有八种不同类型:漫反射贴图、屏蔽、高光贴图、反射贴图、凹凸细节贴图、位移贴图、法线(凹凸细节和位移贴图)、法线(位移)
Now you can add a bump and reflection map, by selecting Mighty Tiles Pro Map Selector in the Material Map/Browser.
Here you select the map type for output. There are eight (8) different map types : Diffuse, Mask, Specular, Reflection, Bump details (Tiles), Displacement, Normals (Bump details & Displacement), Normals (Displacement only).


木板材质/The Wooden Boards
关于这个材质我从Wooden Board使用了一个混合材质作为基础材质,使用一个土材料作为涂层材质,又使用黑白纹理作为Dirt Mask来产生混合效果。
For this material I used a Blend Material made from a Wooden Board as “Base Material” and one dirt material as “Coat Material” and a black & white texture as the Dirt Mask to facilitate the blend.

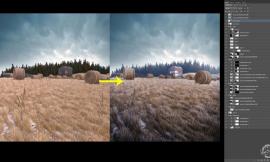
渲染设置/Render Setup
我经常用一个发光贴图渲染白昼图,用适度设置解决灯光缓存方案。我使用gamma值为2.2的颜色贴图,这样制作出的图颜色较浅,不够清晰。将图调暗很容易,在后期制作中增加对比度即可。
最后的渲染带有一定的商业目的,所以分辨率需要被调高到4000像素。所有的图被下列配置的2个工作站上进行了渲染:
• Motherboard Intel 79TO
• Processor Intel Core i7 3930K 3.2 Ghz, 6 cores, 12 threads
• Graphics card ASUS GTX TITAN-6GD5 6GB Memory
I usually render day time images with an Irradiance Map and Light Cache solution with moderate settings. I worked with gamma 2.2 color mapping which resulted in a lighter image with less contrast. It is easy to make the image darker, and increase contrast during the post production.
The final renders were intended to be in a commercial handout thus the resolution had to be high at 4000 pixels wide. All the images were rendered on 2 workstations with this configuration:
• Motherboard Intel 79TO
• Processor Intel Core i7 3930K 3.2 Ghz, 6 cores, 12 threads
• Graphics card ASUS GTX TITAN-6GD5 6GB Memory
后期制作/Post Production
在任何最后的渲染中我没必要做太多的后期工作,我已经使用了一些渲染元素,如VRayRaw Reflection, VRayRawRefraction, VRayReflection, VRayTotalLighting, VRayWireColor, VRayZDepth and VrayExtraTexture as AO pass。
I didn’t have to do very much postwork on any of the final renders. I have used a couple of render elements such as VRayRaw Reflection, VRayRawRefraction, VRayReflection, VRayTotalLighting, VRayWireColor, VRayZDepth and VrayExtraTexture as AO pass.

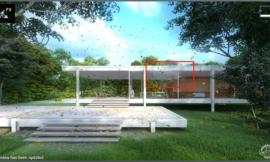
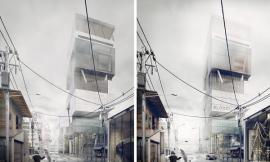
这是一个富有活力的GIF序列展示后期制作的过程。
希望大家喜欢这篇文章,能找到一些新的或有趣的地方添加到你们的工作流中。
谢谢
Here is an animated GIF sequence showcasing the stages of post-production .
I hope you enjoyed reading this article and find something new or interesting to add to your workflow.
Thanks!
出处:本文译自www.ronenbekerman.com/,转载请注明出处。
|
|