Making of Queen Alia Airport
由专筑网Vigo,刘庆新编译
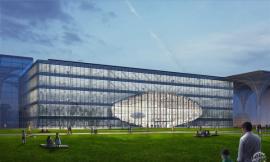
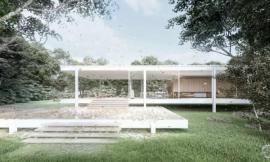
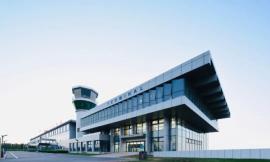
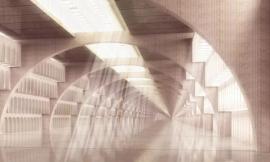
Marcin ‘NEB’ Jastrzebski的阿利亚皇后机场视图中用MODO和Cinema4D展示了出色的CG技术。它是用Corona Renderer插件渲染,又在PS中巧妙地编排了最后效果图。这个视图再次创建了约旦安曼Foster + Partners事务所所作设计的真实效果,并获得“2016年第15周最佳视图”。这篇博文Marcin 描述了他的创建过程,更多关注点放在了关键原则上,其次是技术方面。请欣赏吧。
Marcin ‘NEB’ Jastrzebski’s ‘Queen Alia Airport’ visual, recreating the real deal designed by Foster + Partners in Amman, Jordan, awarded him with Best Visualization of the Week NO. 15/2016 for a remarkable CG remake modeled with Modo and Cinema4d, rendered with Corona Renderer and masterfully orchestrated for the final result in Photoshop. Follow this article as Marcin describes his process, focusing more on key principals then the technical aspects. Enjoy!
Introduction/简介
当我开始写这篇制作教程的时候,在想我应该说点什么呢。最后,我决定写一写视图创建过程中我的理解,而没有注重建模、渲染和灯光设置等类似这些技术细节。实际上,我收到的大部分问题都与任何创建过程的总体“大概念”有关,这些与技术方面是独立分开的。
这是我用Corona renderer创作的第一个真正的作品(你可以在这里直接下载v1.3 demo)。
当我开始投入到阿利亚皇后机场项目中时,关于最后呈现的基调和光线我有两个想法:
• 带有强烈色彩的日落和强烈的暖光。
• 暴雨中的冷雨基调。
当我开始一个新项目的时候,我总是先有一个规划,就是我想要完成什么。这样就涉及到视图的主要概念和最终效果的主要设想。
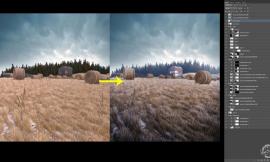
最后,我决定制作一张雨天渲染图。我开始搜集相关材料,一些是为制造整体氛围做准备,一些是为雨天和相关事务做准备。
When I started writing this making-of I was thinking what should I tell about it. Finally, I decided to write about my understanding of the image creation process, not being focused on technical details like modeling, rendering, and light setups. As a matter if fact, most questions I receive have to do with general “large concepts” of any creation process and which are independent of technical aspects.
This was my first real work made with Corona renderer (you can download the v1.3 demo directly here).
When I started working on the Queen Alia project I had two ideas for the final mood and light :
A sunset and strong warm light with intense colors.
A cold rainy mood with heavy rain.
I always try to start a new project when I have a ready plan for what I want to accomplish with it. By that, I refer to the main concept of the image and main assumptions about the final effect.
In the end, I decided to make the rainy weather view. I began gathering reference materials for the overall mood and some for the rainy day and effects related to this.

我决定在2D后期制作中做许多工作,因为这个作品我在参考图中增加了伟大的艺术家Mike Barr的雨中街道图。我想最后的图中清晰有秩序的元素及背景中颜色也能够一致,因为机场是一个交通拥挤的地方。
Because I decided to make a lot of work in 2d post production for this work I added to my reference images rain streets paintings of the great artist Mike Barr. I wanted the final image to be color consistent with clear ordered composition and also beside this dynamized due to the fact that the airport is a heavy traffic place.

Modeling/建模
我依靠的是照片、图片和蓝图...
I relied on photos and images and image blueprints…


你可以在Archdaily上看到更多的图。建模阶段对于我来说非常困难,因为我没有在网上找到阿利亚皇后机场更好的蓝图。屋顶有机形状的制作是一个主要的难题,这也是机场的主要特征。
More to be seen on Archdaily
The modeling stage was quite difficult for me due to the fact that I didn’t find better blueprints of the Queen Alia project on the internet. I Mainly had problems with the roofing organic shapes… which is the main feature of this airport.

我在Modo中对这些元素建模,使用样条曲线建模技术。
I modeled these elements in Modo using spline patch modeling technique.

形状固定后我为屋顶上的动感线条创建了曲线,这是创建布尔型物体的基础。将它们在提到的屋顶部分中切断,并在水泥形状中分离出来。
After freezing these shapes I created splines for the groove lines which exist in the roofing. It was a base to create boolean objects and cut them in the mentioned roof parts and divide parts of the concrete shapes.

其余的场景模型建立的很快,因为没有很多的细节,没有将它们带到Cinema 4D中设置绘图场景,而是最后决定相机的角度。
做了这个重要的决定后我回到Modo,完成这个建模阶段,但是只是对于可见部分。通过这种方式我避免不必要的建模元素。
I made the rest of the scene models very quickly without too many details and imported them into Cinema 4D to set the draft scene and make a final decision about camera point of view.
After this important decision I came back to Modo and finished the modeling stage but only for the visible parts. I avoided modeling unnecessary things this way.

将完成的模型再次引进C4D中,我将它们作为实例对象进行复制,为最后视图效果设置场景。我打算在后期制作中创建整体背景。
After importing the finished models again to C4D, I cloned them as instance objects and set the scene for the final view. I planned to make the entire background space in post-production.

Rendering with Corona Renderer/用Corona Renderer进行渲染
我在Corona renderer中制作最后的渲染图。
这是我用此种插件完成的第一个大项目,以前只是完成过小的、简单的室内测试场景。我对怎样有效地将Corona Renderer应用在两个平台上印象很深刻(我在3dsmax和C4D使用它)。设置灯光、材质编辑、置换和其他因素的效果非常好,而且,每一件事都很容易学习使用。
最后,用Corona Renderer制作的这些因素非常有效,我们完全可以得到想要的效果。Corona Renderer材质编辑对于我来说太简单,是从Maxwell Render中拿来的。但是,从另一方面来说,这个强项完全符合Corona Renderer创造者的主要哲学观。他们认为应该把Corona作为一个强大的、高级的渲染器,使用起来简单有效。这在Cinima 4D的A5版本中也能看出来。
关于Corona Renderer有许多中观点。你可以发现每天在网上有很多用这个渲染器制作的作品。除了高质量和快速渲染外,我觉得还有一个值得学习和使用的地方就是它扩充的多通道体系和强大的反锯齿设置。这些因素在后期制作中很需要。
如果我们在后期制作中用过许多额外的通道和遮罩来分开多个图,反锯齿设置品质是很严格的。渲染额外通道的品质高,我们的工作会进行的很顺利。
我的Photoshop图层方案:
I made the final render in Corona renderer.
It was my first big project done with this renderer after previously done only small and simple interior test scenes. I’m really impressed how effectively Corona Renderer works on both platforms (I used it on both 3dsmax and C4D). The light setup, material editing, displacement and other features work great and everything is easy to learn and use.
Finally, those factors make the work with Corona Renderer very effective and we can achieve desired effects in render without problems. Corona Renderer material editor looks too simple for me, coming to it from Maxwell Render. But from another side, this is the strong point consistent with the main philosophy of the Corona Renderer creators. They assume to make Corona as a powerful and advanced renderer with easy and effective use which is visible even in the A5 version for Cinema 4D.
There are a lot of great opinions about Corona Renderer. We can see many great works done with it every day on the internet. Apart from the great quality and fast render, I decided to learn and use Corona Renderer in view of great and expanded multipass system and great antialiasing. Those factors are very desirable in post-production works.
Anti-aliasing quality is crucial if we use a lot of additional channels and masks during post-production stage to separate many image parts. Great quality of rendered additional channels makes our work smooth.
My Photoshop Layers Scheme :

我决定最后渲染图分辨率(宽度)设置为6000 pixels,尽管我知道我只需呈现出其一半的分辨率即可。
高分辨率和前面提到的Corona Renderer品质会使后期制作阶段的工作进行的非常舒服。如果我没有记错的话,这个阶段不用完善遮罩。这太棒了!
I decided to make the final render at 6000 pixels width resolution despite the fact that I knew that I would present it at half of that resolution version.
High resolution connected with mentioned Corona Renderer quality ensures very comfortable work at the post-production stage. If I remember correctly no refine masks were needed during the work. That was cool!


灯光设置和渲染设置很简单,我使用一张来自DutchSkies数据库的阴天HDRI图, 并下载到一个标准的带有漫射和放射口的Corona着色器中。在上面加上天空(Corona天空标签被移除了),通过纹理过滤器稍加修正。
关于室内人工照明我制作了简单的平面(位于天花板下方),然后从照明数据库里找到Evermotion物体作为室外照明。我给室内照明的所有的元素用柔和的颜色增加了简单的发射着色器,而室外照明的所有元素则增加了碧绿色。
相机设置被修正到与周围环境协调,我将白平衡值从默认的6500改为5500,从而获得一个冷色调。我打开相机对象运动模糊来获得用在该项目中的移动的汽车。我通过10帧激活了两辆车的运动,设置了相机快门速度,如在显示世界到四分之一秒帧数值,当车出色地移动时,渲染到第五帧。这样的效果很真实,我决定在渲染中直接作出这个效果,省去了在后期制作中处理。
The light setup and render settings were simple. I used a cloudy HDRI image taken from DutchSkies library and loaded it into a standard Corona shader in the diffuse and emission slots. Added it to the sky (the Corona sky tag was removed) and corrected a little by texture filter.
I made simple planes for interior artificial lights (positioned under the ceiling) and used Evermotion objects from lights library for exterior lights. I added to all of them simple emission shaders with warm color for interior lighting and aquamarine color tint for exterior lighting.
Camera settings were corrected to the environment strength and I changed the white balance value from default 6500 to 5500 to achieve a cold mood. I turned on the camera object motion blur for moving cars objects which I used in this project. I just animated two cars movement through ten frames, set camera shutter speed such as in the real world to 1/4 sec value and rendered the fifth frame when cars were nicely moving. The result was realistic and I decided to make this effect directly in the render and not in post production.


我用在环境中的DutchSkies HDRI贴图。
The DutchSkies HDRI map which I used for the environment.

前面提到了,我制作了6000×3600像素最后渲染。我不记得渲染时间和我获得了多少通道,我只是在晚上渲染。如果没有严格的期限,我会有机会尽可能达到最好的渲染质量。
原始渲染是为后期制作和色调映射做准备的。我将它保存为32 bit的EXR文件,用Arion FX做了原始修正。我经常使用Arion做主要的修正,也用来制作虚化效果。
As I mentioned before, I made 6000×3600 pixels final render. I don’t remember the rendering time and how many passes I achieved. I just let it rendering during the night. If I haven’t a strict deadline I get every opportunity to reach the best render quality as possible.
The raw render was prepared for post-production and tone mapping. I saved it as 32-bit EXR file and made initial corrections with Arion FX. Usually, I use Arion for main corrections and also for bloom effect.

The Composition/构图
从开始,对于该图我有一个想好的主要设计概念,当然许多元素需要再整个创建过程中才能决定。
我决定展示漂亮的屋顶形状和不朽的建筑,但是,我想展示开放的外部空间,所以我制作一块空地来表现出下雨的效果。这样就需要在最后构成和我的想法之间达到合理的平衡。
相机是我用来展示建筑的基础工具。对于我来说,一个首要问题就是怎样设置焦距。我通过使用宽角焦距应该使建筑形状弯曲到何种程度,或者如果我想避免它,使用更接近标准值乃至长焦镜头该怎么做。
这种情况下,我设置相机焦距为28mm。比如在现实中28mm对于全画幅数码相机是很漂亮的宽角设置。首先,我不需要将原始有机屋顶扭曲太多,因为它们已经很吸引人了。其次,制作一个动态构成,宽角会起到很大帮助(请看下图),同时在图的右上侧强调了屋顶的形状。28mm焦距在这些设想中恰好保持一个平衡。这样,我得到了一个漂亮的屋顶形状,也能展示足够的室外空间。
From the beginning, I had a ready main concept for this image, but of course, a lot of elements can be determined during the whole creation process.
I decided to show the beautiful roofing shapes and monumental architecture but also, I wanted to show the open outside space to make a field for the rain effect. It needed to get the right balance in the final composition consistent with my ideas.
A camera is a basic tool which we use to show the architecture. For me, one of the initial questions is how to set the focal length. How deep I should distort the building shapes by using wide angle focal length or if I should avoid it and use more close to standard values or even a telelens.
In this case, I have set the camera focal length to 28mm for two reasons. Such as in real world 28mm for full frame digital cameras is quite nice wide angle setup. Firstly, I don’t need to distort too much the original organic roofing shapes because they are attractive in their own form. Secondly, to make a dynamic composition a wide angle helped a lot ( please look at the picture below) and additionally emphasize the roofing shapes in the top right part of the image. 28mm focal length was right to keep a good balance between those assumptions. In this way, I achieved nice roofing shapes and also could show enough outside space.

我将主要构成部分分成几个区域,尝试为他们配色和设计细节。首先是给整个画面影响最大的冷色调。
I divided the main composition to a few areas and tried to predict the colors and details for them. First is the main cold color mood which gives the biggest influence on the entire image.

其次是屋顶下方的一个小坡度。它确保了美丽的灯光效果,但是,随着画面里面的黑暗,设计师有好的条件强调室内灯光。
The second is a light gradient under the roofing. It ensures nice light effect but also, following the darkness in the depth of the image ensures good conditions to emphasize the interior light.

室内空间位于整个画面的一个小区域,但是对我而言,这块区域依然重要。毕竟这是一个机场,与画面主要的冷色调部分相反,这里采用的是暖色灯光。视野中这一小块暖光区域足以吸引我们的注意力。
The interior space covers a small area of the whole image but for me, it’s important too. After all, it’s an airport! I used warm light for this part as an opposite to the cold main part. The small warm light part of the view focuses our attention quite effectively and enough by this way.

这里没有承载过多的构成元素,我又小心地添加了一些额外的元素,如汽车和人物。最重要的一点是人物位于红色汽车的旁边。我避免了中心位置(大多时候这是一个构成错误),将它们安置在靠近重要构成点的位置,这和基本的摄影规则是一致的。
Without overloading the composition, I added additional elements like cars and people carefully. The most important point are the people located beside the red car. I avoided the central position (in most cases it’s a composition mistake) and located them close to one of the important composition points which are consistent with basic photography rules.

第一个方案的构成通过三辆汽车连接起来,这对于视野来说足够了。我非常小心,避免汽车灯光太强。因为强光会喧宾夺主。
The first plan composition I connected mainly by three cars. It’s enough for the view. I was careful not to over burn the car lights. Bright light will focus our attention too much.

在我看来,将整体构成分成几个区域有助于我们保持清晰、明显的最终效果。这样我们可以侧重画面中的主要方面,一步一步到达更清晰的效果。在创建中做许多选择时不会失去主要设计理念。
In my opinion, dividing the entire composition to a few areas helps us keep the clear and distinct final effect. I mean that we can focus on main aspects of the view and move step by step to a more detailed effect on the way to the final image without loosing the main concept among a lot of creative decisions.

The Colors/颜色
除了构成,颜色也很重要。开始相机白平衡值设置为5500k,创建一个基本的冷色调。HDRI创建的灰色的乌云环境也起到了很大作用。除了这些因素,我决定在屋顶下方添加一些人工照明和柔和的室内灯光。在这个案例中,我想象着设计的画面的颜色是怎样的,添加与其一致的灯光。
下图解释了主要颜色概念。
屋顶反射出来的有人工照明、柔和的室内照明和一点碧绿色灯光。
Besides the composition, the colors are also extremely important. The starting point was to set the camera’s white balance value to 5500k. It gave me a basic cold mood. The cloudy almost gray HDRI environment image helped too. These factors aside, I decided to add artificial lights located under the roofing and warm interior light. In this case, I imagined how the colors of the image could look like and added the lights which would be consistent with that.
The following images explain the main color concept.
Artificial lights. Warm bright interior and little aquamarine for roofing reflectors.

我用相关照片建立了一些简单的渲染汽车灯光模型,灯光并不会设置的太亮。
I modified some simply rendered car lights with reference photographs and made them not too bright as I mentioned before.

这是图的整个色彩调配方案,主要有四组。
The entire colors palette scheme for this image. There are four main groups.

在后期制作阶段,我制作了所有的额外元素(比如人物)和上述色彩方案想匹配。下图展示了典型的添加元素的修正过程。
在遮罩的帮助下我修正了颜色。我也改变了渲染汽车的色调和建筑的许多部分以及人行道、墙和街道。
我在左边角落添加了这些人物(来自VIShopper),他们就好像在仰望天空。这是一个机场但是在空中渲染一架飞机对于构成成分来说显得太多了,所以一点暗示就能表现出这一迹象。当空中有飞机经过的时候,相信大家都会情不自禁地抬头看的。
During the work in the post-production stage, I made all additional elements (like people) consistent with the mentioned colors palette. The image below shows typical additional element correction.
I corrected the colors with the help of masks. I also changed the shades of rendered cars and many parts of the building, pavement, walls, and street.
I added these people (assets from VIShopper in this case) in the left corner, acting as the ones looking at the sky… It’s an airport but putting an airplane in the sky would be too much for this composition. A subtle hint could do the trick too… who didn’t look up to the sky arriving at an airport, ha?

The Post Production /后期制作
为了控制重要的表面上的潮湿效果,我制作了两版并分别渲染。我渲染一个干的地面版本和一个能反射出其他道路的非常潮湿的地面版本。这样对于呈现在图中屋顶下或室外部分,我能完全控制创建出正确效果。
例如,我在道路的干湿版本之间和涂画的汽车轨迹之间创建了一个遮罩。道路明显的部分在屋顶下方,但是我有一个想法,汽车轮胎上会从外面带来一些雨水。我在PS中也添加了道路标记线。
To control the wet effects for crucial surfaces, I made two versions of them and rendered separately. I just rendered a dry version of the ground surfaces and a high reflective wet version with additional reflection pass. It gives me a full control creating the right effects related to image parts which are under the roofing or outside.
For example, I created a mask between the road’s dry and wet versions and paint cars trails. The visible part of the road is under the roofing but I created an idea that the cars may carry a rain water from outside on their tires. This effect disappears into the deep of the image. I added also the road mark lines in photoshop.

为道路反射的汽车轮胎痕迹设置的遮罩
Mask for road reflections car tires trails

室内大厅的细节是在PS中制作的,参照图是相似室内空间的混合不同照片。最后,我在这部分添加了一个热闹非凡的效果。
The interior hall details were added in photoshop from mixed different photographs of the similar interior spaces. Finally, I added a bloom effect to this part.

屋顶反射灯光呈现出的碧绿色对整个画面很重要。除了较低处的汽车灯光(左边的白灯和右边的红灯),这些灯也是展示相机湿镜头障碍的重要原因。这个特效强调了雨天的情景。
The aquamarine color of the roofing reflectors light was important to the entire image look. Besides the car lights in the lower level (white on the left and red on the right) these lights were also a great reason to show a camera wet lens obstacles. This effect also emphasizes the overall rainy mood.

我在PS中添加了整个背景空间,这是快速、有效获得此效果的方式,避免了用3D Objects建造一个巨大的场景空间。在雨天,这很简单,因为会有浓雾的效果,这种效果是我使用Z-Depth通道制作的。
另外,我用Corona Renderer渲染了两个不同的Z-Depth通道。一个覆盖从相机到远处的空间,另一个覆盖中间区域到远处的背景空间。它允许在较大的场景渲染中编辑出更自由的雾气效果。
I added the entire background space in photoshop. This is a quick and effective way to achieve this and avoid building a large scale scene space with 3d objects. Due to rainy weather, it was quite easy because there is a strong fog effect which I made by using the Z-Depth channels.
By the way, I rendered two different Z-Depth passes with Corona Renderer. One covered the space from camera to far distant and the second limited little more for the middle distant to far background space. It allows editing more flexible a fog effect for large-scale scenes renders.

我用PS雨刷来制作雨景。在不同的图层上粉刷,为可见视野部分不同高度设置出倾斜度。我用特殊的刷子工具制作出这一效果。
I made the rain using photoshop brushes. Paint it on different layers and set gradients for various levels of visibility. Special brushes were used for this to get the right look.

第一层中的汽车细节都呈现的很清楚,当然它们会受到下雨的影响。我用照片替换了渲染的反射镜,并在汽车上添加了潮湿、脏污的细节。
Cars in the first level are very visible in details and it was necessary to make them affected by the rain. I replace rendered reflectors by photographs and added wet and dirty details on the cars.

最后,在最后图中我用 Lightroom做了一点颜色修正操作,然后在 Red Giant Looks插件中进行影视特效。主要是针对热闹非凡的效果,图底部的装饰图案,还有屋顶右侧和色差。
Finally, I made a little color correction to the final image in Lightroom and after that in Red Giant Looks plugin for After Effects. It was mainly the bloom effect, vignette especially for the bottom part of the image and right side of the roofing and chromatic aberration.

完结
我确实很喜欢这张渲染图,我希望你们喜欢这个制作过程。谢谢Ronen的邀请,让我有机会在你的博客上展示我的作品。
That’s all!
I really enjoyed working on this image and I hope that you enjoyed reading the making-of. Thank you, Ronen, for the invitation and opportunity to present part of my work on your great blog again!
出处:本文译自www.ronenbekerman.com/,转载请注明出处。
|
|