Interior Elevations Tutorial
我以前答应过大家,把视频教程和工作流程放在一起,讲述了我仅用 Photoshop 来创建带颜色的内部立面。有许多东西需要复习,我很惊讶我能把这些内容放在一个 15 分钟的视频里。然而,完成内部立面最终效果的一系列步骤及控制所有的图层都对成功起着很大的作用,该视频被分解为6个步骤,总结如下:
As promised, I put together a video tutorial explaining the workflow that I use to create colored interior elevations using only Photoshop. There was a lot to go over, and I’m surprised I was able to fit it all in one 15 minute video. The steps are not difficult in terms of skill required, however, the sequence of steps to build up the elevation plays a big role in the success of the final image as well as maintaining control of all of the layers. The video is broken down into 6 steps which are summarized below.
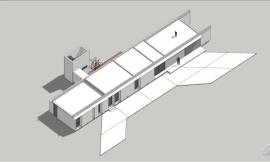
第一步:填充
在视频中,我在 Photoshop 里填充了剖面和视图的外部,这样做是为了简化工作,然而,我会强烈建议在 CAD 或Illustrator里来完成此步骤,以此获得更精确的最终结果。
STEP 1: POCHE
In the video, I filled in the section cut and exterior of the illustration in Photoshop. This was done to simplify things, however, I would strongly suggest executing this step in CAD or Illustrator for more precise final results.

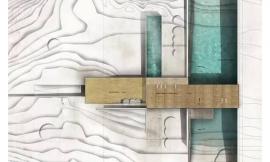
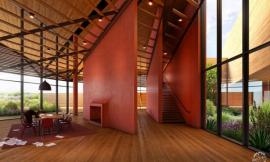
第二步:材质
在这一步,要添加墙体的材质和其他建筑元素,我建议将所有相同的材质合并在一个图层里(例如合并所有在不同房间里的木头材质到一个图层),很多时候,我想调整色调,亮度或者某些材质的色阶,更少的图层意味着我可以转变的更快。
STEP 2: TEXTURES
In this step, the textures of the walls and other architectural elements are added. One things I suggest doing is merging all of the same textures into one layer (such as merging all of the wood textures in the different rooms into one layer). Many times, I want to adjust the hue, brightness, or levels of certain textures. Minimizing the amount of layers means I can make these changes quickly.

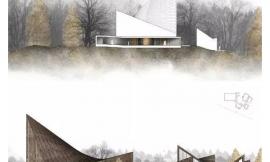
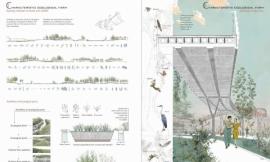
第三步:背景
这一步包括添加通过窗户可以看到的景观背景信息,背景很容易分散注意力,将观众的注意力从内部空间设计中分散开。为了避免这种情况,我往往使背景的颜色更加单一,这意味着我要把颜色弄成一个色调,在这种情况下,我选择蓝色来衬托暖色调的木材。
STEP 3: BACKGROUND
This step involves adding background information that can be seen through windows. It’s very easy for the background to get distracting, pulling the viewers’ attention away from the interior spaces. To avoid this, I tend to make the backgrounds more monochromatic, meaning I stick with one hue of color. In this case, I chose blue to compliment the warm tones of the wood.

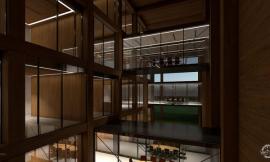
第四步:阴影
这一步是整个过程重要的一步,是立面图里高深的一步,我的建议是走进一间像视频中的房间里,阴影要添加在房间的角落的环境,例如:墙面和天花板的交界处,或者墙面与墙面的交界处。此外,这里应该有一个变化的深度,阴影应该被添加到例如楼梯扶手。你可以看我的教程“环境光遮蔽教程”或者“快速剖面图教程”,它们都包含了添加更深入的阴影的话题。
STEP 4: SHADOWS
This step is an important part of the process, and is where depth is given to the elevations. My advice is to go one room at a time like in the video. Shadow is added where you have a corner condition such as where the wall meets the ceiling or where a wall meets another wall. Also when there is a change in depth, shadow should be added such as in the stair railing. Check out my “Ambient Occlusion” tutorial or my “Quick Sections” tutorial which both cover the topic of adding shadow in more depth.

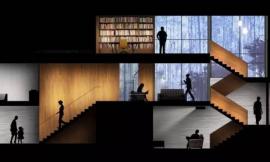
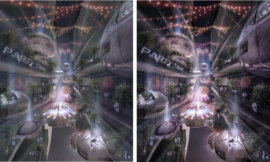
第五步:灯光
第五步讨论的是增加现场超明和重点照明,这一步给图面带来了温暖,还带来了影响空间的重要组成部分,添加灯光很简单,用画笔画出白色并把图层的混合模式改为“叠加模式”,为了增加灯光的强度,可以复制图层。
STEP 5: LIGHT
Step 5 discusses adding spot lighting and accent lighting. This puts warmth into the illustrations and brings attention to the important parts of the space. Adding light is as simple as adding white paint and setting the layer blend mode to “overlay”. To punch up the strength of the light, duplicate the layer.

第六步:移民
最后一步是添加合适比例的人物和家具,通常我会在这里花费很多时间,我有一个巨大素材库包含着我已经弄好的人物素材,但是找到合适角度的家具可能会很困难。大多时候,这意味着需要扭曲图片来让它们看起来像是在立面图中。有大量的内部立面图被毁在了这个阶段,所以这个阶段多花点时间,争取做好。
STEP 6: POPULATE
The final step invloves adding scaled people and furniture. This is where a lot of my time is usually spent. I have a huge library of people already cut out, but finding furniture at the correct angle can be difficult. Most of the time, this means distorting pics to look like they are in elevation. Take your time at this stage, because this is where a lot of interior elevations can get ruined with shotty Photoshop work.

出处:本文译自visualizingarchitecture.com/,转载请注明出处。
|
|
专于设计,筑就未来
无论您身在何方;无论您作品规模大小;无论您是否已在设计等相关领域小有名气;无论您是否已成功求学、步入职业设计师队伍;只要你有想法、有创意、有能力,专筑网都愿为您提供一个展示自己的舞台
投稿邮箱:submit@iarch.cn 如何向专筑投稿?