Making of NEON Light
由专筑网韩平,刘庆新编译
2003年,氖灯如同篝火一样给了Nicole & Markus Heilmann设计光声装置的灵感。你在这里所见的是Markus亲自制作该装置的模拟过程,这都源自一个失败的文档!配上Bram van der Poel酷酷的音乐,整个效果非常棒,我们也非常想知道这是怎么做到的。我很好奇他是否用同样的方式展现真实的事物。
NEON is a campfire inspired light and sound installation by Nicole & Markus Heilmann from 2003. What you see here is a virtual simulation of that installation done by Markus himself driven by a what can only be described as bad documentation! The result, accompanied by cool sound design & music by Bram van der Poel, is pretty remarkable and we get to see how it was made too. I wonder if he would ever document the real thing the same way?

作者:Markus Heilmann
Markus Heilmann是一名建筑师,还是CGI/虚拟摄影,3d插图,效果图,动画及照明设计等领域的3d媒体艺术家。自2003年来,他就开始创建虚拟建筑基地,室内室外空间并在建筑可视化领域达到最高水平。
Author : Markus Heilmann
Markus Heilmann works as an architect and 3d-media artist in the fields of CGI / virtual photography, 3d illustration, visualization, animation and designing with light. Since 2003, He creates virtual architecture sets, indoor and outdoor spaces and develop architectural visualization at the highest level.
灵感/Inspiration
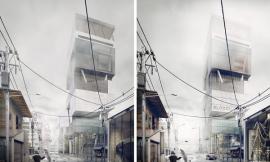
“氖灯”是我在2003年制作一个光声装置。由于设备不够先进,最终我只留下了几张模糊的照片以及对那个美丽装置的记忆。因此可以说,之前的失败文件使我决定制作该虚拟装置的。
首先,我想介绍下该装置并说明我想重建的原因。
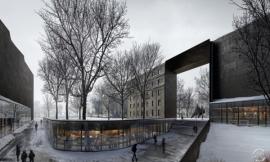
该物品的主要部分是由调光器控制的交叉荧光管。管子的外型十分简洁,一个没有任何装置的发光线性体块。因此灯夹的部分显得尤为重要——所有可能的技术设备比如控制器、电子镇流器和电线都安置在该处。利用灯夹可以将氖气灯管与电话线和螺旋终端联系在一起。
该物品所在的房间,墙面为白色,地板为木地板——非常空旷,没有任何细节。
该装置的生命来自光和声的运动。
NEON is a light and sound installation I did in 2003. Thanks to my bad equipment, there was nothing left at the end apart from a few grainy photos and the memory of a really beautiful installation. So you could say the decision to do a virtual simulation of the installation was driven by the bad documentation!
At first I`m going to describe the installation itself to illustrate the situation I wanted to recreate.
The main part of the object were the crossed fluorescent tubes which were controlled by a dimmer. The look of these tubes was to be as clean as possible – luminous lines without any other visible devices. Therefore the podest played a very important part – all the necessary technical equipment like controller, electronic ballast and cables were stored there. This allowed me to connect the neon tubes with bell wire and screw terminals.
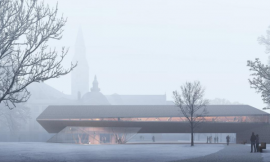
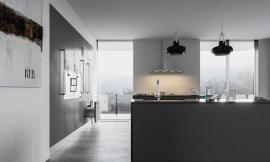
The room in which the object was installed was a high white room with a wooden floor – very bare and without any detail.
The life of the installation came from the movement of the light and sound.
建模/Modelling
正如我之前所说,氖气灯管是主体部分,所以我决定使用特写镜头来展示。所可以看到很多细节,比如电线和螺旋形终端。我们利用标准多边形建模技术建了所有的构件。该灯模型制作最精彩的应该是我制作细节的方式。
As I said before, the neon tubes played the main part, so I decided to show them in closeup. Therefore most of the detail can be found here, mainly the wires and the screw terminals. All parts are done with standard polygon modelling techniques. The only remarkable thing about the modelling of the light object was the way I did the details.
为达到我期望的完美造型,我花费了一些时间来扭曲CAD线条般笔直的电线以及一圈一圈旋转成螺旋终端。
It took a little while to deform the straight CAD-like wires and rotate the screw terminals to give the model the non-perfect look I prefer.
我只将房间建成盒子体块,完全不加装饰,也没有任何细节——类似毛坯房。和你们一样,我没有看到令我眼前一亮的事物。你也许会说,有一点乏味?你说对了。
我必须抉择一下了是将场景内的所有模型的细节都加完后再设置镜头,还是反其道而行之。
我选择了后者,因此我先设立了镜头,然后在往场景里增加细节。
I modeled the room as a box room, completely undercoated and almost without detail – really close to the original room. As you can see, at this time there was nothing particularly exciting in my scene. A little boring, you say? You`re right.
Here I had to decide to either model a whole scene with all details and then set the cameras, or to do it the other way round.
I decided for the other way round, so I did the camerawork first and then filled the images with some details.
设置镜头和增添细节
和真实的装置一样,我希望视频里只有荧光灯光的光影运动。因此并没有使用任何特效镜头,这也缩短了渲染时间。视频除了光影变化外还希望增减一些情节,因此我决定通过镜头位置的转变和屏幕构图的不同串联整个故事框架。
从特写镜头到长镜头,视频缓缓叙述着这个故事。这也印证了设立镜头的重要性。所有的镜头首先对准灯光,从各个角度展现了其最好的一面。另外,为了增加图片的张力和亮点,我对每个灯管都增加了一个副本。此外,我放置细节只是为了右手边的镜头产生聚焦的焦点而不是为了将模型进一步完善。
Setting the Cameras and Adding Details
As in the real installation, I wanted the only movement in the video to be the light of the fluorescent tubes. So dramatic camera moves had no chance, which had a really positive effect on the render times. To give the video a little story beside the movement of the light, I decided to use the camera positions and screen layout as its stylistic device.
The video is telling the story from closeup to long shot. This meant that setting the cameras was really important. All cameras are targeting the light object at first, to get good results showing the main element. To create images with more tension and excitement I filled them with a counterpart to the tubes. Just one detail placed only for the point of view on the right hand side with no goal other than making a better composition.
镜头1/Camera 1
门部分
part of the door
镜头2/Camera 2
椅子
The chairs
镜头3/Camera 3
镜子部分
Part of a mirror
镜头4/Camera 4
插头插座和房间踢脚
The plug socket and the edge of the room
材质和纹理/Material and Textures
没有比覆上材质和纹理还令人兴奋的事了。下面你可以看到一些例子。
There is nothing very exciting to tell you about the materials and textures. Here you can see some examples.
门/Door
门的材质只利用了凹凸贴图的建筑设计材质。噪波贴图和高度模糊的木纹理产生了不算美观的绘画外观。
The door material is an Arch&Design material with only a Bump map. A mix of a Noise map and a heavily blurred wood texture to get the look of bad brushwork.
墙面/Walls
墙面是一个采用噪波贴图的混合型材质。混合的材质都是建筑设计材质库中的白色材质,它们利用相同的纹理作为凹凸贴图,没有设立反射参数。它们只在贴图尺寸和凹凸的程度上不同。
The wall material is a mix material masked with a Noise map. Both mixed materials are white Arch&Design materials without reflection using the same texture as a Bump map. They only have different map sizes and grades of bump.
地板/Floor
灯管/Tubes
对于灯管,我采用两个不同的材质。一种是用来覆在发光灯管上的,另一个覆在其余的灯上。不发光的灯管的材质是白色低透明度的反射性建筑设计材质。对于发光的灯管,我选用没有增加任何特效的白色高透明度材质。
For the tubes I used two different materials. One for the glowing tube and another for the rest. The material for all non-glowing tubes was an only-white-reflecting low level translucent Arch&Design material. The material I assigned to the glowing tube was a white strong translucent material without any other special properties.
灯光/Lighting
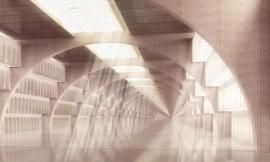
为了整合灯管发出的灯光,我在每个灯管上都围绕中心设立了10个金属射线型天空光光柱。灯光的几何形状与灯管一致,在阴影的映衬下也更加明显。
To generate the light which is emitted by the tubes, I used 10 centrally rotated Metal Ray Sky Light Portals per tube. The geometry of the tube which belongs to the lights was excluded from casting shadows.
为了产生蓝色的日光,我使用了金属射线日光系统和天空光。
To get the blue daylight, I used the Mental Ray Day Light System and a Sky Light Portal.
渲染/Rendering
当然,我本可以在3dsMax中完成灯光强度的所有动画,但是我觉得这还不够自然灵活。所以我希望在Adobe After Effects(AE)中完成这部分。这也为什么我要利用全聚光渲染单个图片。一个是为了可见的灯管,另一个是为了日光。
Of course I could have done all animation of the light intensity in 3dsMax but I thought this was not flexible enough. So I wanted to do this part of the work in Adobe After Effects. This is the reason I rendered a single image for all light sources. One for each visible tube and one for the daylight.
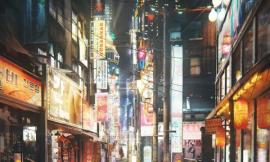
我对以下你见到的所有图片都采用了相同的渲染设定。只是在白点的设置上有细微的差别。对于灯管图片上我使用了5500开尔文白点而对于夜晚夜晚窗户射进的蓝光(月色)我使用了3500开尔文。我还利用AE中的景深插件为图片增加了景深。为了使景深获得较好的效果,我将特写镜头(镜头1-3)图片分离开来置于前景和背景图片中。
I used the same render settings for all images as you can see below. There was only a small difference between the settings of the white point. I used white point 5500 Kelvin for the tube images and 3500 Kelvin to generate the typical blue light coming through a window in the evening.
Depth of field also was generated in Adobe After Effects by using the Frischluft plugin. So I split the images of the close-ups (cameras 1-3) into foreground and background images to get better results when computing the depth of field.
以下是一些裸渲的图片,有32字节exr格式的天空光和灯管,8字节tif格式的Alpha通道、Z深度图片和遮罩图片。
Here are some RAW renderings of Skylight 32 bit exr, Tubes 32 bit exr, Alpha 8 bit tif, Z-depth 8 bit tif and Masks 8 bit tif.
动画/Animation
现在我们可以让我们的视频动起来了。经过在AE中的多次测试,我们发现这种经典的视频编辑软件可以方便地将复杂的动画与音乐的节奏衔接上,而且效果很不错。我先在Adobe Premiere中制作一个低分辨率的预览小样,这样我可以整合重要元素出现的时间点,比如灯管灯光的衰减和增强,景深镜头移动及混合镜头等,接着我再在AE中进行转译。我没有使用真实的灯管图片,而是用了遮罩图片与alpha通道混合的白色平面。然后我用简单的方法使其透明度看起来更生动。
这可以保证动画一开始就很清晰,不必要在AE中再次设置所有重要的场景。当然远不止这样。
This was the time to bring my Video alive. After some tests in Adobe After Effects, it quickly became clear that timing such a complex animation to the rhythm of sound is better done with a classic video-editing software. That is the reason why I decided to generate a low-res preview in Adobe Premiere, where I defined the whole time line with all important elements like tubes fading in and out, playing with depth of field and blending the cameras, and to transfer this to After Effects later.
Instead of the real tube images, here I used white planes with alpha information generated from the mask images shown above. Then I animated its opacity in a very simple way.
Just to make this clear right at the beginning – it wasn’t necessary to set all these key-frames a second time in After Effects. But more on this later.
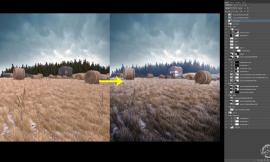
接下来你可以看到预览小样。视频中所有用红色标出的序列就是景深镜头运用的时刻。
Here you can see the preview. All the red-highlighted sequences in this video are time marks for playing with depth of field.
影像合成/Compositing
下面我将向你们展示影像合成的样本,样本主要是将第一镜头和采用相同运行方式的其他镜头进行合成。首先,我使用前景和背景图片将所有发光层(天空和灯管)都放在单一组中。然后利用景深插件,调节并运行景深,是其更生动。
I am going to show you the compositing I have done by using the example of the first camera – all the other cameras work with the same principle.
At first I put together all „light“ layers (skylight and tubes) in single compositions using the foreground and background images. Then I adjusted and animated the depth of field by using the Frischluft plugin.
天空光/Skylight
灯管/Tubes
之后我在将所有图层结合添加的混合图层集中到一个新的组。现在我需要将预览小样导入AE。接着,我打开调整好的预览文件,关掉白色平面的alpha通道层。然后每个灯管都产生一个简单黑白色的视频,标明R1.mov, R2.mov, R3.mov…为了在AE中得到真实灯管的效果,我设置了与黑白视频相匹配透明度信息。
After that I gathered all layers in a new composition combining them with layer blend mode “add”. Now I had to bring my preview animation to After Effects. Therefore I used the already animated Premiere file, turned off the alpha information of the white planes, and rendered out one video for each tube called R1.mov, R2.mov, R3.mov… – just videos blending from black to white and back and so on. With the set mate effect linked to black and white videos I generated the opacity information for the the real tube images in Adobe After Effects.
我按比例放大到105%,并利用wiggler(摇摆)调节镜头的轻微抖动。
I scaled the result to about 105 percent and generated little camera shake using the wiggler.
下面你可以看到制作过程的全过程。
Here you can see an overview showing the compositing process.
此刻我也意识到该项项目中,我没有采用任何像“magic bullet(魔法子弹)”这样的色彩更正插件。当然我也采用了变通的方法,而且效果也很好:我生成了一系列16字节tif格式的视频,然后在PS中对色彩更正,纹理,发光贴图等进行调整。最后我记录行动堆栈,并利用成批处理工具得到最终的视频。
我希望你们能喜欢这篇制作教程,也希望你们能有所收获••••••
At the time I realized this project I did not have any color correct plugins like magic bullet. So I had to do a work-around. But this worked really well: I rendered out the video as a 16 bit tif sequence and did the colour correction, grain, glow and so on in Adobe Photoshop. Then I recorded an action stack and used the batch tool to generate the final video.
I hope you enjoyed reading this Making-Of and could find some useful information…
出处:本文译自www.ronenbekerman.com/,转载请注明出处。
|
|