Oblique Floor Plans
由专筑网严越,刘庆新编译
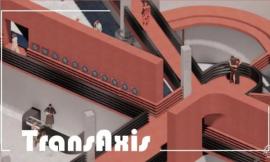
我还在继续研究实验室的设计,我想做一些比标准的平面线图包含更多信息性的图。所以我用这些链接里的SU技巧,把平面图变成斜投影图。这样的平面图不会扭曲,好处可以度量内容并进行缩放。然而,不同于二维平面图,还会有一个三维度的感觉,让所谓的平面图更清楚地阐明墙壁材料和构造。下面是快速教程。
Continuing work on my research lab design, I wanted to generate floor plans that were a little more informational than the standard line drawings. Therefore, I turned the floor plans into oblique projection drawings using my Sketchup model and a technique described many years ago seen here. Using this method, the plans do not distort allowing one to still measure off of them and put to scale. However, unlike 2d floor plans, these have a three dimensional feel to them allowing for more articulation of wall materials and tectonics. Below is a quick break down of the illustration.

SU的线条工作/Sketchup Line Work

Vray环境遮挡渲染/V-Ray Ambient Occlusion Rendering

Vray粘土渲染/V-Ray Clay Rendering

叠加三个图层/Three Layers Combined
1. 制作基本图像和渲染
我使用了三张基本图像来作为主体。一张Sketchup 导出线性制图,两张Vray的渲染图 。然后在 Sketchup重叠三者。线性制图和 AO画法用于添加详细信息,阐明几何图形的数据。相比粘土渲染,我偏好前二张的效果。
1. Compile Base Images and Renderings
I used three base images to compile the bulk of the illustration. I used a line work export from Sketchup, an ambient occlusion rendering from V-Ray, and a clay rendering from V-Ray. I then combined them in Sketchup to get the above image. The line work and AO pass add detail that help articulate what is happening with the geometry. Since I am going for more of a diagrammatic image, I leaned on these passes more than the clay rendering.

2. Poche
本插图的重点是描述平面布置图的设计。为达到偏向轴测图的效果,我把剖面部分在PS里用黑色油漆加深。
2. Poche
The focus of this illustration is to describe the floor plan design. Therefore, I want to play up the cut of the section. To do this, I painted the section cut in Photoshop with black paint.

3. 额外细节
最后把地板漆成了深灰色, 来和剖面形成更强的反差。我还加入了一些树枝, 丰富一下纹理。
3. Extra Details
I ended up painting the floor a dark grey to create more of a contrast between it and the walls. I also abstractly introduced sticks representing trees to give a some texture to the illustration.

4. 拉伸
拉伸了图像, 使它成为一个倾斜的平面之前, 添加了一些注释。Sketchup 模型中创建一个倾斜图象的教程,查看的话请点这里。
4. Stretch
At this point, I stretched the image to make it a plan oblique before I add text. Again, the process of creating a plan oblique image from a Sketchup model can be seen here.


5. 注释和最终上色
我最后增加了一些注释,用Topaz快速做了一些颜色编辑。我希望在做最终项目页面的时候还能再次更改颜色。
5. Annotation and Final Coloring
Finally, I dropped in some annotation and did some quick color editing using Topaz. I expect coloring may change again once I start developing final page spreads for the project.
出处:本文译自visualizingarchitecture.com/,转载请注明出处。
|
|
专于设计,筑就未来
无论您身在何方;无论您作品规模大小;无论您是否已在设计等相关领域小有名气;无论您是否已成功求学、步入职业设计师队伍;只要你有想法、有创意、有能力,专筑网都愿为您提供一个展示自己的舞台
投稿邮箱:submit@iarch.cn 如何向专筑投稿?