Making of Private Residence
由专筑网Vigo,刘庆新编译
Phil Buerer对我们来说并不陌生,之前我们也发表过他的文章。今天我将刊登他的第三篇文章——关于制作Lanaras别墅场景。这次他做的是一个已经建成的建筑,就如同往常一样,这次他只用了照片。这个建筑由建筑师Nicos Valsamakis于1963年设计。这次Cinema 4d、Vray Photoshop成为这次主要的渲染工具。
Phil Buerer is not stranger here, with two best of week awards (BOW 22/2014 and BOW 33/2014) and two articles published as well! Today I’m very happy to publish his third article about the making-of Villa Lanaras. He recreates an already built project, as he usually likes to do from photos. Just a single photo this time. This house was designed by architect Nicos Valsamakis at Anavyssos back in 1963. Cinema 4d, V-Ray for Cinema 4d and Photoshop are the main tools used in this project. Enjoy!
前言/Introduction
感谢小编将我的别墅项目发表的博客上。这不是个大项目,但却是我最喜欢的一个项目。其简洁性是最吸引我的地方。
当我在做我的个人项目的时候,我总是尝试不同的新方式,虽然会有很多的失败,但是却没有外界的压力。从这些失败中学到很多新东西,并且能够知道客户的反应。今天的项目就是这样的尝试。
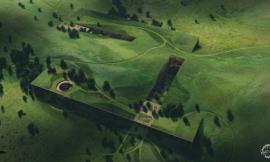
很早以前,我碰到希腊建筑师Nicos Valsamakis。他在19世纪60年代以设计别墅文闻名,很多年过去了,我一直将他的Lanaras别墅照片作为我的电脑桌面。我总是希望有一天我可以做一张这个照片的渲染图。
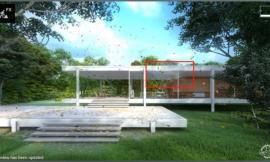
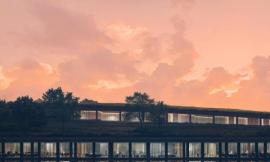
这是原始照片(来源:midmodandmore.blogspot.ch)
Hello, and thanks Ronen for the opportunity to write about my Project “Private Residence” in this blog. It’s not the biggest project I ever did but definitely one of my favorite renderings. Its simplicity is what I find most appealing.
Whenever I can, I do personal projects, where I can explore new things, without outside pressure but a lot of opportunities to fail. And learn from said failures without taking hits in terms of customer satisfaction. Such as in this case.
A long time ago I came across a greek architect by the name of Nicos Valsamakis. He rose to fame in the ninety sixties with spectacular designs of villas. For years, I had this particular photograph from his “Villa Lanaras, Anavyssos” on my desktop. Always thinking that one day I’m gonna try to create a rendering from this shot.
Here’s the original photograph (source: midmodandmore.blogspot.ch).

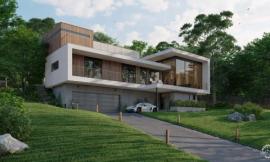
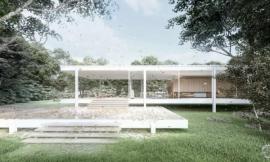
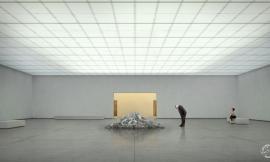
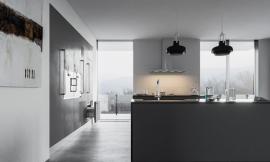
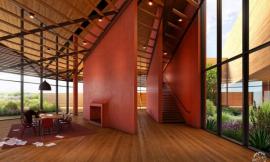
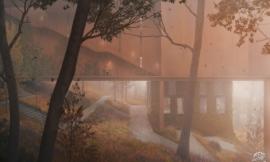
这是我最后的成品。
Then after a while I finally did it, here’s the result.

3D建模/3d Modeling
这个案例中建模过程非常简单。从照片和建筑规范上很容易得到建筑的尺寸。我们可以通过简单的猜测计算出房子的进深。
视线高度应该是1.5米。
The modeling part was obviously very simple in this case. It’s easy to get the right height proportions from the photo with some guidelines. We could even calculate the right depth by using some simple math.
The starting point was an estimation of 150 cm height for the car.

模型按照照片上的形式由几个块体组成。没有什么特别的方式。
The Model consists of cubes placed in the right place with assumed proportions. Some extruding and voila. Nothing magic here.

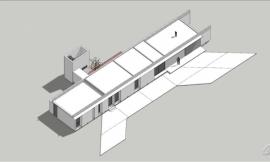
为了确认建成的模型以及相机位置及焦距,我把原照片放在了半透明的模型后作为背景图片。然后手动调节直到跟原照片相似。
In order to check the modeling process and to match the camera position and focal length, I placed the original photo in the background of the semi-transparent model of the house. While sitting in the camera I moved and rotated manually until the preview more or less with the original photo.

同样,以原照片作为参考,我建了一个简单的地形。我简单的做了下地面分缝使水平线显得更明显。之后我只是在稍稍的改动了magnet工具的z 参数,同时保证x和y参数锁定,便得到了这个结果。
Still using the picture as a reference I used a simple plane for the terrain. Subdivided just enough to be able to get the main contour lines. Then I just “painted” the terrain by subtly changing the Z value of the vertices with the “Magnet” tool (keeping X and Y locked).

灯光/Lighting
我不希望在后期加光,因此在我渲染的时候,我采用了HDRI贴图以得到一个真实的图像。虽然Vray 物理光源渲染得更快一些,我依然更喜欢高精度的HDRI。
这回对于室外渲染很重要。
我在Area/Dome light选项里选用Peter Guthrie’s 1224 Clear Sky。
通过使用C4D的滤镜,我将gamma alue降低到了0.7以得到更清晰的阴影。
Opposed to elsewhere light comes after modeling. I knew I was going to use an HDRI in order to get a realistic rendering. While V-Ray Physical Sun and Sky render faster, I still prefer a high-quality HDRI for optimized results.
This is especially the case for exterior renderings.
I used Peter Guthrie’s 1224 Clear Sky in an Area/Dome light. By using a C4D “Filter” I lowered the gamma value to 0.7 in order to get sharper shadows.

环境/Environment
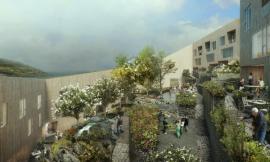
项目最耗时的就是环境的制造。其中,我花费了大量的时间来处理植物上的细节。我希望植物更加的真实,吸引人们的眼球。让整个场景看起来凌乱一些,以便突出建筑本身。
我使用了我自己资料库里36种独立模型。(有一些来自Evermotion Turbosquid,HQ-Plants还有一些是我自己的模型。)
Time for the most time-consuming part of the project. The environment and as part thereof the vegetation is where I invested the most time, getting the small details right. I wanted plants etc. to be as realistic as possible in order catch the eye and lock it on to details that don’t look too organized. Giving the whole scene a touch of organic chaos in contrast to the very structured look of the house itself.
I used 36 individual 3d models from my personal library (some Evermotion, Turbosquid, HQ-Plants and a few self-made models too).

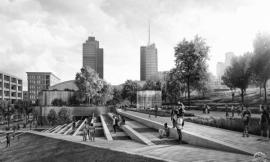
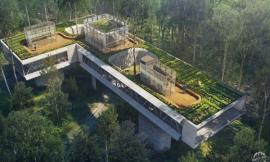
这是植被、石头、树枝等布置在环境中的顶视图。
Here’s a top-view of the plants, stones, branches etc, as placed in the scene.

通常,我最先会放置大的植物,然后在空的地方放些小的东西。然后复制地形并且移动这些形体到没有植物的地方。采用Cinema4D的Mograph物体将我自己的模型进行随机的复制,缩放以及旋转。
Usually, I start by placing the largest plants first and filling in with objects decreasing in size. First, I duplicated the terrain plane and removed the polygons, where no plants would be placed. Using Cinema4D’s fabulous “MoGraph” object I distributed my models on the remaining polygons with the “Random Effector” linked into “MoGraph” in order to rotate and scale the objects automatically and randomly.

先置大的植物,然后在空的地方放些小的东西。
Starting with a few large ones, and filling it with more and smaller objects.

关于道路,我采用了一样的方式,将石头从大到小放置。
For the road, I used the same technique, from the larger stones and objects to small pebbles.


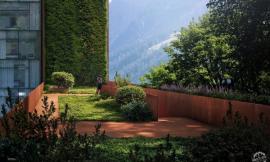
这是成果。
Here’s an image of the result.

车的模型从Archive 3D里下载。只需要调整vray材质。
The car model is from Archive 3D. Just had to create the V-Ray materials. If only it was that easy to get an Aston martin outside the virtual world… but still, thanks archive3d.

纹理/Texturing
在这个项目里,我采用非常简单的材质,没什么特别的。最复杂的是地形的材质。由三种纹理组成。一种是砂石,一种是被vertex map混合的道路材质,并且被覆盖到了C4D的图层里。这样,砂石和道路之间便有了良好的过度。第三种材质是我在ps里先画的具有擦痕和阴影的车辙印。随后我采用了混合材质来融合砂石和车辙。
On the house, I generally used very simple and basic materials. Nothing too fancy here. The most complex material was for the terrain. It consists of 3 textures. One for the sand and one for the road blended together into one material with a “Vertex Map” and masked with Cinema4D layers. This is to achieve a smooth transition from sand to road, and will be explained in detail below. The third texture is car-tracks I painted in Photoshop and used for the bumps and shading on top of the first material. Then I used “Mix Textures” to blend the sand/stone and the tracks together. All in all less complicated than it sounds.

为了在路上混合砂土,让其自然,我先在vertex map里进行绘制,用一种新的材质将其分离。
To blend the sand and the gravel on the road together, and achieve that smooth transition I mentioned above, I first painted a “Vertex Map” which I then used on a new material to separate the two main textures.

现在,我将vray材质附给地面。采用C4D图层,vertex map现在被作为蒙版在默认通道使用,同时将道路的纹理附在上层,而砂石的纹理在下曾。
Now, I assigned a new “VrayAdvancedMaterial” to the terrain. Using Cinema4D layers, the “Vertex Map” can now be used as a mask in the diffuse channel, blending the road texture on top into the sand texture at the bottom.

为了加深车辙印,我在地形上增加了新的材质。开启混合纹理选项,使用黑白纹理作为材质重量,这样便可以将车辙印独立出来。对于车辙印的材质,我叠加了很多的色彩和搽痕上去,让每一块碎石都看上去不一样。
In order to imprint the ruts on the gravel road, I created a new material on top of the terrain material. Enabling the mix textures option, and using the b/w ruts texture as the material weight, I was able to manage the car-tracks independently from the main material. For the car-tracks material I just varied the color and bump setting ever so slightly, to get a subtly different look for the gravel, where I wanted the car-tracks to show.

效果很明显,但是在我看来,重要的细节会给整个场景增加进深。这便是场地的最终材质设置。
The result is barely visible in the end, but in my opinion, an important detail, giving the scene depth. Here’s the final terrain material.

然后重要的就是植被的材质。一些已经建成的植物模型有双面材质就不需要进行调节了,只需统一 一下色调便可以了。有时候在C4D里加载的模型没有材质,那就要附上双面材质。Frankly a must for leaf shaders. 树叶必须要有阴影。为了增加真实性,我尽量选择那些绿色调的植被。这里是个案例。
The other very important materials are those for the vegetation. Some of the ready made plant models came with great 2sided materials which didn’t need any adjustments at all while others only had a color assigned. Or, something that every Cinema4d user probably came across, a load of obj, fbx models with no materials I tried to use only 2sided materials. Also, for added realism, I made an extra effort to create a lot of variation in the green tones. Here’s one example.

然后将其合并成为双面材质。
Then combined with a 2 side material.

这是材质球应用到模型上的效果。
And here’s how this material looks like applied to a model.

渲染/Rendering
首先,让我们看下相机设置。
First of all, let’s take a look at the camera settings.

这是最终的渲染设置,采用了5888×3944像素的尺寸。
Here are the render settings for the final output with a resolution of 5888×3944 pixels.

最后将渲染图存为16bit的TIF格式,并且将深度、反射和材质分色图分别制作成单独的渲染层。
The final rendering was saved as a 16 bit TIF, with z-depth, specular, reflection, and material ID’s rendered in separate passes.

后期/Postwork
渲染之后的图片仅在Photoshop里处理。我不得不说后期处理非常神奇。
The rendering was significantly edited in Photoshop. I would say the real magic was added in post.

Raw 渲染饱和度过高,缺乏层次与对比。这是后期制作的完美开场。经过多年的经验,我发现我总是按照自己惯用的顺序。一下便是我多年珍藏的技巧。
The raw render was over saturated, with little contrast and almost no depth. A perfect starting point for the post ;). Over the last years, I found myself always performing the same steps. So, here are my well rehearsed secret magic techniques. Because it’s secret I won’t go over every single layer, hah!
Pass 文件夹,所有的渲染曾放在这里也在这里调整。
Folder “pass”, all render passes are placed and adjusted here.

Kore文件夹,主要是曝光,曲线,亮度对比度。
Folder “kore”, where I do the main exposure, curves, brightness and contrast.

Color文件夹,非常重要,主要的色彩调整都在这里。
Folder “color”, most important one, main color correction is happening here.

Effect文件夹,实验文件夹,FX
Folder “effect”, the experimenting folder, FX.

滤镜文件夹,颜色查找等
Folder “filter”, color lookup and so on.

Fin文件夹,镜头矫正,锐化等
Folder “fin”, lens correction, sharpening and so on.

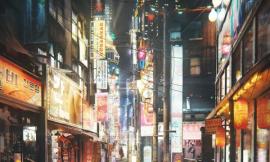
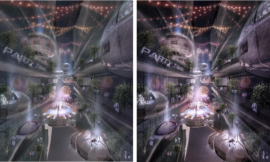
至此,我非常满意这个成果,但我决定再做些特效。我使用了一些滤镜来合成这张照片。最终生成这个效果。
At this point, I was very happy with the result, but I decided to make another more dramatic version. With some filter re-combinations from the previous version, I ended with this version.

完成了,我真心希望这些经验可以对大家有所帮助。如果有什么问题可以来信问我。
And that’s it. I really hope that some information, somehow, somewhere, helped someone. Feel free to ask anything in the comment section below.
出处:本文译自http://www.ronenbekerman.com/,转载请注明出处。
|
|